多租户架构模式:超越基础
SaaS平台的高级多租户架构模式——从数据隔离策略到按租户定制和扩展。
大多数多租户指南止步于“添加一个 tenant_id 列并过滤你的查询”。这能让你撑过最初的几个月。然后,一个拥有十倍数据的租户开始降低其他所有人的性能,一个企业潜在客户询问白标,一个合作伙伴想要集成他们自己的支付处理器。突然间,基础知识就不够用了。
本文将介绍我在生产多租户系统中实现的一些超越查询范围的模式。这些架构决策将原型与平台区分开来。
高级隔离模式
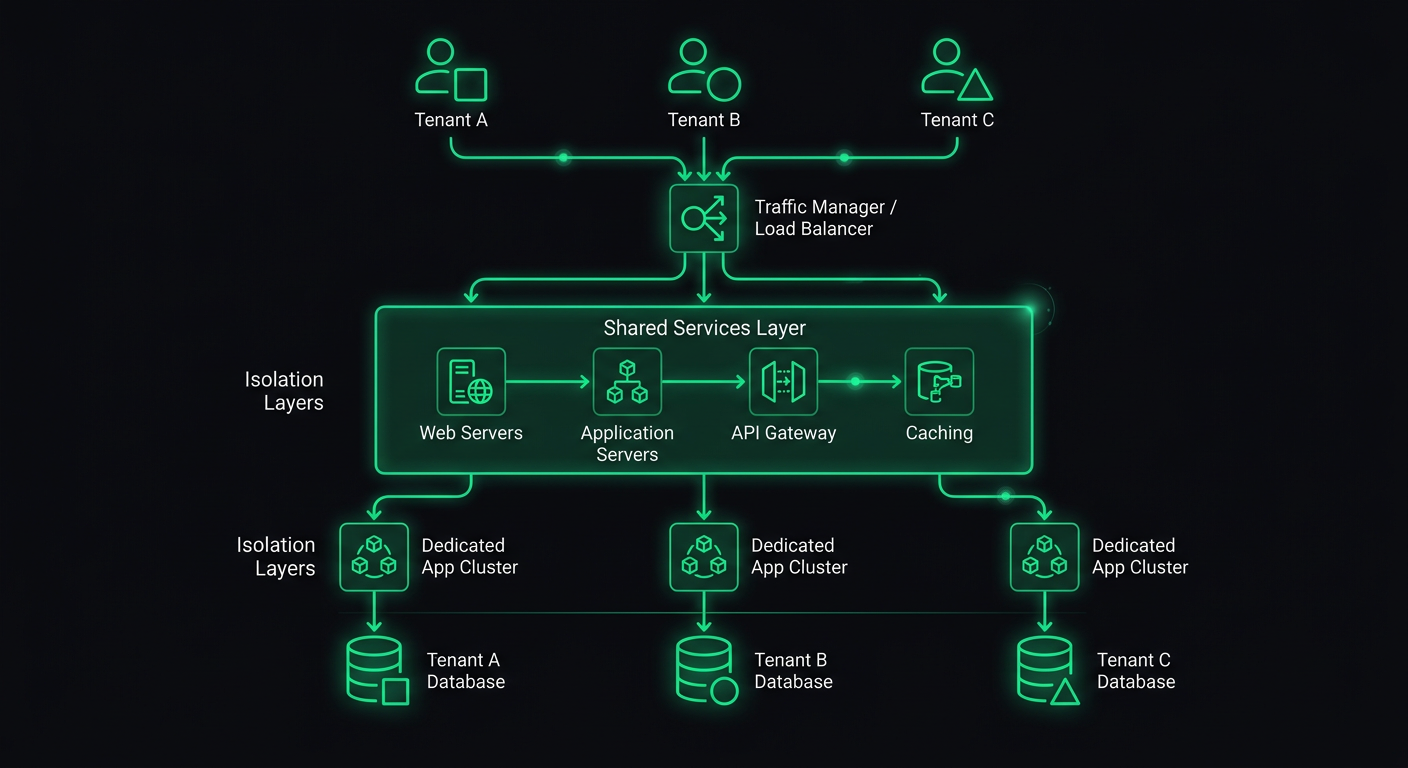
共享数据库、每个租户一个模式(schema-per-tenant)和每个租户一个数据库(database-per-tenant)的三层模型已广为人知。而较少讨论的是大多数生产系统最终实际采用的混合方法。
按客户群体分层隔离
实际上,你很少会选择一种隔离级别并统一应用。相反,你会根据每个客户群体的需求和支付意愿来分层隔离。
interface TenantConfig {
  id: string;
  slug: string;
  isolationLevel: "shared" | "schema" | "dedicated";
  databaseUrl?: string; // only for dedicated tenants
  schemaName?: string;  // only for schema-isolated tenants
}

function getConnectionForTenant(tenant: TenantConfig) {
  switch (tenant.isolationLevel) {
    case "shared":
      return getSharedPool();
    case "schema":
      return getSchemaConnection(tenant.schemaName!);
    case "dedicated":
      return getDedicatedConnection(tenant.databaseUrl!);
  }
}
共享层服务于你的自助服务客户。模式隔离服务于需要合规性文档的中端市场客户。专用数据库服务于需要物理数据隔离的企业客户。
关键设计约束:你的应用程序代码不应该知道或关心租户位于哪个层级。连接解析发生在中间件中,所有下游都使用相同的查询接口。如果路由处理程序必须检查隔离级别来决定如何查询数据,那么你的抽象就泄露了。
行级安全作为安全网
PostgreSQL 的行级安全(Row-Level Security, RLS)是多租户架构中最被低估的功能之一。即使你的应用层有严格的查询范围限制,RLS 也能提供数据库级别的保证,确保一个租户无法访问另一个租户的数据。
ALTER TABLE orders ENABLE ROW LEVEL SECURITY;

CREATE POLICY tenant_isolation ON orders
  USING (tenant_id = current_setting('app.current_tenant')::uuid);

ALTER TABLE orders FORCE ROW LEVEL SECURITY;
在连接层面,你需要在执行任何查询之前设置租户上下文:
async function withTenantContext<T>(
  tenantId: string,
  callback: (client: PoolClient) => Promise<T>
): Promise<T> {
  const client = await pool.connect();
  try {
    await client.query("SET app.current_tenant = $1", [tenantId]);
    return await callback(client);
  } finally {
    await client.query("RESET app.current_tenant");
    client.release();
  }
}
有了它,即使你的应用程序代码存在一个遗漏 WHERE tenant_id = ? 子句的错误,数据库本身也会过滤结果。这为我捕获了生产环境中的真实错误。一位开发人员编写了一个跨表连接的报告查询,却忘记了其中一个表的租户过滤器——RLS 静默地只返回了正确的行,而不是泄露数据。
FORCE ROW LEVEL SECURITY 很重要。没有它,表所有者(通常是你的应用程序使用的角色)会绕过 RLS 策略。有了它,策略将适用于所有人。
租户感知中间件管道
我在之前关于多租户后端文章中介绍的租户解析中间件处理了基础功能:从子域名或 JWT 中提取租户,并将其附加到请求中。但生产系统需要一个更丰富的中间件管道来构建完整的租户上下文。
interface TenantContext {
  id: string;
  slug: string;
  config: TenantConfig;
  plan: PlanTier;
  features: Set<string>;
  limits: TenantLimits;
  branding?: TenantBranding;
}

async function buildTenantContext(tenantId: string): Promise<TenantContext> {
  // Cache this aggressively — it's read on every request
  const cacheKey = `tenant:${tenantId}:context`;
  const cached = await redis.get(cacheKey);
  if (cached) return JSON.parse(cached);

  const [tenant, plan, features, limits, branding] = await Promise.all([
    db("tenants").where({ id: tenantId }).first(),
    db("tenant_plans").where({ tenant_id: tenantId, active: true }).first(),
    db("tenant_features").where({ tenant_id: tenantId, enabled: true }).select("feature_key"),
    db("tenant_limits").where({ tenant_id: tenantId }).first(),
    db("tenant_branding").where({ tenant_id: tenantId }).first(),
  ]);

  const context: TenantContext = {
    id: tenant.id,
    slug: tenant.slug,
    config: tenant.config,
    plan: plan.tier,
    features: new Set(features.map((f) => f.feature_key)),
    limits: limits ?? DEFAULT_LIMITS,
    branding: branding ?? undefined,
  };

  await redis.set(cacheKey, JSON.stringify(context), "EX", 300);
  return context;
}
然后,中间件将这个完整的上下文附加到请求中:
export async function tenantContextMiddleware(
  req: Request,
  res: Response,
  next: NextFunction
) {
  if (!req.tenantId) return next();

  try {
    req.tenantContext = await buildTenantContext(req.tenantId);

    // Check if tenant is active
    if (req.tenantContext.config.status === "suspended") {
      return res.status(403).json({
        error: "Account suspended",
        reason: req.tenantContext.config.suspensionReason,
      });
    }

    next();
  } catch (error) {
    next(error);
  }
}
现在,每个下游处理程序都可以访问完整的租户上下文,而无需进行额外的数据库调用。五分钟的缓存意味着计划更改可以快速传播,但你无需在每个请求中都访问数据库来检查某个功能是否已启用。
每个租户的动态配置
除了功能标志,租户通常还需要可配置的行为。一个餐厅平台可能允许每家餐厅设置自己的订单截止时间、税率、配送区域和通知偏好。一个项目管理工具可能允许每个工作区配置自定义字段、工作流阶段和通知规则。
我使用的模式是将配置分离到一个经过模式验证的 JSON 列中:
import { z } from "zod";

const TenantSettingsSchema = z.object({
  timezone: z.string().default("UTC"),
  locale: z.string().default("en"),
  currency: z.string().default("USD"),
  notifications: z.object({
    emailDigest: z.enum(["daily", "weekly", "never"]).default("daily"),
    slackWebhook: z.string().url().optional(),
    webhookUrl: z.string().url().optional(),
  }).default({}),
  limits: z.object({
    maxUsersOverride: z.number().optional(),
    maxStorageMbOverride: z.number().optional(),
    apiRateLimitOverride: z.number().optional(),
  }).default({}),
  customFields: z.array(z.object({
    key: z.string(),
    label: z.string(),
    type: z.enum(["text", "number", "date", "select"]),
    options: z.array(z.string()).optional(),
    required: z.boolean().default(false),
  })).default([]),
});

type TenantSettings = z.infer<typeof TenantSettingsSchema>;
这些设置以 JSONB 格式存储在 PostgreSQL 中,这为你提供了索引和查询功能,同时保持了模式的灵活性:
async function getTenantSettings(tenantId: string): Promise<TenantSettings> {
  const row = await db("tenant_settings")
    .where({ tenant_id: tenantId })
    .first();

  return TenantSettingsSchema.parse(row?.settings ?? {});
}

async function updateTenantSettings(
  tenantId: string,
  updates: Partial<TenantSettings>
): Promise<TenantSettings> {
  const current = await getTenantSettings(tenantId);
  const merged = { ...current, ...updates };
  const validated = TenantSettingsSchema.parse(merged);

  await db("tenant_settings")
    .insert({
      tenant_id: tenantId,
      settings: validated,
      updated_at: new Date(),
    })
    .onConflict("tenant_id")
    .merge();

  // Invalidate cache
  await redis.del(`tenant:${tenantId}:context`);

  return validated;
}
Zod 模式具有双重作用:它在写入时验证设置,并在读取时提供默认值。如果你添加一个新设置,现有租户会自动获得默认值,而无需进行数据迁移。
每个租户的功能标志
简单的布尔标志对于成熟的平台来说是不够的。你需要支持按百分比发布、基于计划的门控以及按租户覆盖。
interface FeatureFlag {
  key: string;
  defaultEnabled: boolean;
  rolloutPercentage: number; // 0-100
  planMinimum?: PlanTier;
  tenantOverrides: Map<string, boolean>; // explicit per-tenant overrides
}

class FeatureFlagService {
  private flags: Map<string, FeatureFlag>;

  constructor(private cache: CacheStore) {
    this.flags = new Map();
  }

  async isEnabled(tenantId: string, featureKey: string): Promise<boolean> {
    const flag = await this.getFlag(featureKey);
    if (!flag) return false;

    // Explicit per-tenant override takes precedence
    if (flag.tenantOverrides.has(tenantId)) {
      return flag.tenantOverrides.get(tenantId)!;
    }

    // Plan-based gating
    if (flag.planMinimum) {
      const tenantPlan = await this.getTenantPlan(tenantId);
      if (planRank(tenantPlan) < planRank(flag.planMinimum)) {
        return false;
      }
    }

    // Percentage rollout — deterministic based on tenant ID
    if (flag.rolloutPercentage < 100) {
      const hash = this.hashTenantFeature(tenantId, featureKey);
      return hash % 100 < flag.rolloutPercentage;
    }

    return flag.defaultEnabled;
  }

  private hashTenantFeature(tenantId: string, featureKey: string): number {
    const str = `${tenantId}:${featureKey}`;
    let hash = 0;
    for (let i = 0; i < str.length; i++) {
      hash = ((hash << 5) - hash + str.charCodeAt(i)) | 0;
    }
    return Math.abs(hash);
  }
}
确定性哈希对于发布很重要。一个租户要么始终看到该功能,要么始终看不到——你不会希望他们在一次请求中看到,而在下一次请求中看不到。哈希值是根据租户 ID 和功能键计算的,因此不同的功能可以发布给不同的租户子集。
在路由处理程序中,检查是清晰的:
app.get("/api/v2/analytics", async (req, res) => {
  const useNewAnalytics = await featureFlags.isEnabled(
    req.tenantId,
    "analytics_v2"
  );

  if (useNewAnalytics) {
    return res.json(await analyticsV2.getDashboard(req.tenantId));
  }

  return res.json(await analyticsV1.getDashboard(req.tenantId));
});
租户特定集成
企业租户会希望连接他们自己的工具:他们自己的 Stripe 账户用于支付处理,他们自己的 SendGrid 账户用于电子邮件,他们自己的 S3 存储桶用于文件存储。你的平台需要支持这一点,而不会变成配置噩梦。
这种模式是一个集成注册表,它为每个租户解析正确的凭据:
interface IntegrationConfig {
  provider: string;
  credentials: Record<string, string>; // encrypted at rest
  settings: Record<string, unknown>;
  isCustom: boolean; // true = tenant's own account, false = platform default
}

class IntegrationRegistry {
  async getIntegration(
    tenantId: string,
    integrationType: "email" | "payment" | "storage" | "sms"
  ): Promise<IntegrationConfig> {
    // Check for tenant-specific integration first
    const custom = await db("tenant_integrations")
      .where({ tenant_id: tenantId, type: integrationType, active: true })
      .first();

    if (custom) {
      return {
        provider: custom.provider,
        credentials: await decrypt(custom.encrypted_credentials),
        settings: custom.settings,
        isCustom: true,
      };
    }

    // Fall back to platform defaults
    return this.getPlatformDefault(integrationType);
  }
}
然后,服务层使用注册表获取正确的客户端:
class EmailService {
  constructor(private integrations: IntegrationRegistry) {}

  async sendEmail(tenantId: string, email: EmailPayload): Promise<void> {
    const config = await this.integrations.getIntegration(tenantId, "email");

    const client = this.createClient(config);
    await client.send({
      from: config.settings.fromAddress as string,
      ...email,
    });
  }

  private createClient(config: IntegrationConfig): EmailClient {
    switch (config.provider) {
      case "sendgrid":
        return new SendGridClient(config.credentials.apiKey);
      case "ses":
        return new SESClient(config.credentials);
      case "resend":
        return new ResendClient(config.credentials.apiKey);
      default:
        throw new Error(`Unknown email provider: ${config.provider}`);
    }
  }
}
这意味着一个租户可以使用平台共享的 SendGrid 账户,而另一个租户可以使用他们自己的 Amazon SES 实例,拥有自己的域名和信誉。你的应用程序代码的其余部分不知道也不关心——它调用 emailService.sendEmail(),集成层处理路由。
凭据安全在这里是不可协商的。 租户提供的 API 密钥必须在静态时加密,最好使用每个租户的加密密钥。使用 AWS KMS 或 HashiCorp Vault 等工具来管理它——不要自己实现加密密钥管理。
隔离级别之间的数据迁移
多租户系统中最棘手的操作挑战之一是将租户从一个隔离级别迁移到另一个隔离级别。一个不断增长的租户可能会从共享表迁移到他们自己的模式。一笔企业交易可能需要将租户迁移到专用数据库。
迁移需要零停机时间,这意味着你不能仅仅进行转储和恢复。这是我使用的模式:
interface TenantMigration {
  tenantId: string;
  fromLevel: IsolationLevel;
  toLevel: IsolationLevel;
  status: "pending" | "syncing" | "verifying" | "cutover" | "complete" | "failed";
  startedAt: Date;
  completedAt?: Date;
}

class TenantMigrator {
  async migrateToSchema(tenantId: string): Promise<void> {
    const migration = await this.createMigration(tenantId, "shared", "schema");

    try {
      // 1. Create the target schema with all tables
      await this.createSchema(tenantId);
      await this.updateStatus(migration, "syncing");

      // 2. Copy existing data to the new schema
      await this.copyData(tenantId, "public", `tenant_${tenantId}`);

      // 3. Set up Change Data Capture to sync ongoing writes
      const cdcStream = await this.startCDC(tenantId, "public", `tenant_${tenantId}`);

      // 4. Verify data consistency
      await this.updateStatus(migration, "verifying");
      const isConsistent = await this.verifyConsistency(tenantId);
      if (!isConsistent) throw new Error("Data consistency check failed");

      // 5. Cutover: update tenant config to point to new schema
      await this.updateStatus(migration, "cutover");
      await db("tenants").where({ id: tenantId }).update({
        isolation_level: "schema",
        schema_name: `tenant_${tenantId}`,
      });

      // 6. Invalidate caches
      await redis.del(`tenant:${tenantId}:context`);

      // 7. Stop CDC and clean up source data
      await cdcStream.stop();
      await this.cleanupSourceData(tenantId, "public");

      await this.updateStatus(migration, "complete");
    } catch (error) {
      await this.updateStatus(migration, "failed");
      await this.rollback(migration);
      throw error;
    }
  }
}
变更数据捕获(Change Data Capture, CDC)步骤至关重要。在复制初始数据和执行切换之间,新的写入操作正在共享表上发生。CDC 捕获这些写入并将它们重放到新模式中,从而确保数据不丢失。
实际上,我为此使用了 PostgreSQL 逻辑复制。你在源表上创建一个按 tenant_id 过滤的发布,并在目标模式上创建一个订阅。一旦复制延迟接近零,你就可以执行切换。
回滚路径同样重要。如果在迁移过程中出现任何故障,你需要能够干净地撤销所有操作。这意味着在迁移得到验证并且租户在新模式上运行了一段置信期(我通常在清理源数据之前等待 48 小时)之前,保持源数据完整。
每个租户的监控和可观察性
在多租户系统中,“API 很慢”是无法采取行动的。你需要知道哪个租户受到影响,哪些查询很慢,以及问题是租户特有的(吵闹的邻居、大数据集)还是平台范围的。
import { metrics } from "./lib/metrics"; // Prometheus, Datadog, etc.

function tenantMetricsMiddleware(req: Request, res: Response, next: NextFunction) {
  const start = Date.now();

  res.on("finish", () => {
    const duration = Date.now() - start;
    const labels = {
      tenant_id: req.tenantId,
      method: req.method,
      route: req.route?.path ?? "unknown",
      status: String(res.statusCode),
    };

    metrics.histogram("http_request_duration_ms", duration, labels);
    metrics.counter("http_requests_total", 1, labels);

    // Alert on tenant-specific degradation
    if (duration > 2000) {
      metrics.counter("http_slow_requests_total", 1, labels);
    }
  });

  next();
}
除了请求级别的指标,还要跟踪每个租户的资源消耗:
interface TenantUsageMetrics {
  tenantId: string;
  period: string; // "2026-03"
  apiCalls: number;
  storageBytes: number;
  bandwidthBytes: number;
  computeMs: number;
  activeUsers: number;
}

class UsageTracker {
  async recordAPICall(tenantId: string, durationMs: number): Promise<void> {
    const period = this.getCurrentPeriod();
    await redis.hincrby(`usage:${tenantId}:${period}`, "apiCalls", 1);
    await redis.hincrby(`usage:${tenantId}:${period}`, "computeMs", durationMs);
  }

  async getUsage(tenantId: string, period: string): Promise<TenantUsageMetrics> {
    const data = await redis.hgetall(`usage:${tenantId}:${period}`);
    return {
      tenantId,
      period,
      apiCalls: parseInt(data.apiCalls ?? "0"),
      storageBytes: parseInt(data.storageBytes ?? "0"),
      bandwidthBytes: parseInt(data.bandwidthBytes ?? "0"),
      computeMs: parseInt(data.computeMs ?? "0"),
      activeUsers: parseInt(data.activeUsers ?? "0"),
    };
  }
}
这些数据有三个用途:计费(基于使用量的定价)、容量规划(哪些租户增长最快)和调试(这个租户的缓慢体验是由于他们的数据量还是平台问题)。
设置带有租户级别细分的仪表板。当警报触发时,你应该能够在几秒钟内看到它影响的是一个租户还是所有租户。这将你的事件响应从“有些东西很慢”转变为“租户 X 的分析查询很慢,因为他们的数据集增长超出了我们当前索引有效的阈值。”
计费集成模式
多租户系统中的计费不仅仅是“每月向每个租户收费”。你需要处理计划层级、基于使用量的组件、基于席位的定价以及周期中的升级和降级。
class BillingService {
  private stripe: Stripe;

  async syncPlanChange(tenantId: string, newPlan: PlanTier): Promise<void> {
    const tenant = await db("tenants").where({ id: tenantId }).first();

    // Update Stripe subscription
    const subscription = await this.stripe.subscriptions.retrieve(
      tenant.stripe_subscription_id
    );

    await this.stripe.subscriptions.update(subscription.id, {
      items: [{
        id: subscription.items.data[0].id,
        price: PLAN_PRICE_IDS[newPlan],
      }],
      proration_behavior: "create_prorations",
    });

    // Sync feature flags based on new plan
    await this.syncFeatureFlags(tenantId, newPlan);

    // Update limits
    await this.syncLimits(tenantId, newPlan);

    // Invalidate tenant context cache
    await redis.del(`tenant:${tenantId}:context`);
  }

  private async syncFeatureFlags(tenantId: string, plan: PlanTier): Promise<void> {
    const planFeatures = PLAN_FEATURE_MAP[plan];

    // Disable features not included in new plan
    await db("tenant_features")
      .where({ tenant_id: tenantId })
      .whereNotIn("feature_key", planFeatures)
      .update({ enabled: false });

    // Enable features included in new plan
    for (const feature of planFeatures) {
      await db("tenant_features")
        .insert({ tenant_id: tenantId, feature_key: feature, enabled: true })
        .onConflict(["tenant_id", "feature_key"])
        .merge();
    }
  }
}
对于基于使用量的计费,你在每个计费周期结束时向 Stripe 报告使用量:
async function reportUsageToStripe(tenantId: string): Promise<void> {
  const tenant = await db("tenants").where({ id: tenantId }).first();
  const usage = await usageTracker.getUsage(tenantId, getCurrentPeriod());

  // Report metered usage for API calls
  await stripe.subscriptionItems.createUsageRecord(
    tenant.stripe_metered_item_id,
    {
      quantity: usage.apiCalls,
      timestamp: Math.floor(Date.now() / 1000),
      action: "set",
    }
  );
}
在每个计费周期结束时,将其作为 cron 任务运行,并实现幂等性,以确保运行两次不会重复收费。
白标架构
白标是租户将你的平台呈现为他们自己产品的能力。这意味着自定义域名、自定义品牌、自定义电子邮件模板,有时甚至是自定义 UI 主题。
该架构主要关注两个方面:路由和主题。
自定义域名路由
// Tenant domain mapping
interface TenantDomain {
  tenantId: string;
  domain: string;        // "orders.acme-restaurant.com"
  sslStatus: "pending" | "active" | "expired";
  verifiedAt?: Date;
}

async function resolveCustomDomain(hostname: string): Promise<string | null> {
  const mapping = await redis.get(`domain:${hostname}`);
  if (mapping) return mapping;

  const row = await db("tenant_domains")
    .where({ domain: hostname, ssl_status: "active" })
    .first();

  if (row) {
    await redis.set(`domain:${hostname}`, row.tenant_id, "EX", 3600);
    return row.tenant_id;
  }

  return null;
}
在你的租户解析中间件中,在回退到子域名解析之前检查自定义域名:
export async function tenantMiddleware(req: Request, res: Response, next: NextFunction) {
  // 1. Check JWT claim
  // ... (existing logic)

  // 2. Check custom domain
  const customTenantId = await resolveCustomDomain(req.hostname);
  if (customTenantId) {
    req.tenantId = customTenantId;
    return next();
  }

  // 3. Fall back to subdomain
  // ... (existing logic)
}
对于自定义域名的 SSL,为你的子域名使用通配符证书,并为自定义域名使用 Let's Encrypt 结合 DNS 或 HTTP 挑战。像 Caddy 或 Cloudflare for SaaS 这样的服务可以完全自动化这一过程。
主题和品牌
interface TenantBranding {
  tenantId: string;
  logoUrl: string;
  faviconUrl: string;
  primaryColor: string;
  secondaryColor: string;
  fontFamily?: string;
  customCSS?: string;
  emailFromName: string;
  emailFromAddress: string;
  supportUrl?: string;
  termsUrl?: string;
  privacyUrl?: string;
}
在前端,将品牌注入为 CSS 自定义属性:
function applyBranding(branding: TenantBranding) {
  const root = document.documentElement;
  root.style.setProperty("--color-primary", branding.primaryColor);
  root.style.setProperty("--color-secondary", branding.secondaryColor);
  if (branding.fontFamily) {
    root.style.setProperty("--font-family", branding.fontFamily);
  }
}
如果平台是服务器渲染的,将品牌注入到初始 HTML 响应中,这样就不会出现未样式化内容的闪烁。对于 Next.js,这意味着在你的根布局中读取品牌,并在 <html> 或 <body> 标签中内联设置 CSS 变量。
对于电子邮件模板,在渲染时使用租户的品牌上下文:
async function sendTenantEmail(tenantId: string, template: string, data: unknown) {
  const branding = await getBranding(tenantId);
  const integration = await integrations.getIntegration(tenantId, "email");

  const html = renderEmailTemplate(template, {
    ...data,
    logo: branding.logoUrl,
    primaryColor: branding.primaryColor,
    companyName: branding.emailFromName,
  });

  await emailClient(integration).send({
    from: `${branding.emailFromName} <${branding.emailFromAddress}>`,
    html,
  });
}
最终用户永远不会看到你平台的品牌。他们看到的是租户的标志、颜色、域名和发件地址。对他们来说,这就是租户的产品。
扩展考量
随着租户数量的增长,某些模式会停止工作,需要被替换。
连接池变得至关重要。 对于共享数据库,你可能从每个应用程序实例一个连接池开始。但当你采用每个租户一个模式或每个租户一个数据库时,简单的连接管理会耗尽你的连接限制。对于共享数据库,在事务模式下使用 PgBouncer;对于模式隔离,实现连接池分区,其中连接按租户活动比例分配。
缓存失效变得更难。 对于单个 Redis 实例,删除租户的缓存很简单。对于分布式缓存,你需要广播失效事件。使用 Redis Pub/Sub 或专用的事件总线来在所有应用程序实例中传播缓存失效。
后台作业需要租户上下文。 你入队的每个作业都必须携带租户 ID。作业处理器必须设置与 HTTP 中间件相同的租户上下文(数据库连接、功能标志、限制)。我为作业处理程序创建了一个 withTenantScope 包装器:
function withTenantScope(handler: (tenantId: string, data: unknown) => Promise<void>) {
  return async (job: Job) => {
    const { tenantId, ...data } = job.data;
    const tenant = await buildTenantContext(tenantId);

    // Set up database context
    await withTenantContext(tenantId, async () => {
      await handler(tenantId, data);
    });
  };
}

// Usage
queue.process("generate-report", withTenantScope(async (tenantId, data) => {
  // This handler runs with full tenant context
  const report = await generateReport(tenantId, data);
  await storeReport(tenantId, report);
}));
“吵闹的邻居”检测 对于共享基础设施至关重要。跟踪每个租户的查询执行时间、CPU 使用率和内存。当一个租户的工作负载开始降低共享池的性能时,你有三个选择:限制他们、将他们迁移到更高的隔离层,或者优化他们特定的查询。监控为你提供了在其他租户受到影响之前做出决策的数据。
整合所有内容
生产级多租户架构并非单一模式——它是一系列相互作用的决策堆栈。隔离策略影响你的连接管理。功能标志影响计费。白标影响你的整个前端渲染管道。自定义集成影响你的错误处理和监控。
我建议从头开始构建的团队遵循以下顺序:
- 从共享一切和租户范围的查询开始。首先找到你的产品市场契合点。
- 一旦你有了定价页面,就立即添加功能标志和基于计划的门控。
- 当你的第一个企业客户提出要求时,构建集成注册表。
- 当合规性要求需要时,实施模式隔离。
- 当合作伙伴想要转售你的平台时,添加白标功能。
- 当你需要将租户在不同层级之间移动时,构建迁移工具。
每一层都建立在前一层之上。中间件管道、范围查询接口和集成注册表是支持其上所有内容的基础。把这些做好,高级模式就会水到渠成。
我已经在餐厅平台、医疗 SaaS 和项目管理工具中构建了这些模式。领域不同,但多租户挑战却惊人地一致。在适当的租户隔离、配置和可观察性方面的投入,在你赢得第一个企业客户并被问到“我的数据是如何与你们的其他客户分开的?”的那一刻,就会得到回报。
这个问题是一个购买信号。你构建的架构就是答案。