在生产环境中真正有效的 CI/CD 管道设置
经过实战检验的真实项目 CI/CD 模式——从 GitHub Actions 工作流到不会在周五破坏生产环境的部署策略。
我为生产项目设置的第一个 CI/CD 管道是一个单一的 GitHub Actions 工作流,它运行 npm test,然后通过 SSH 部署到 VPS。它一直工作,直到它不再工作——一次失败的部署让服务器在周五晚上处于半更新状态,我花了一个周末手动恢复文件。那次经历告诉我,部署管道不仅仅是“运行测试然后部署”。它是介于 git push 和用户看到新代码之间的整个检查、门控和回滚机制系统。
这篇文章涵盖了我通过多个生产项目完善的管道架构,并提供了你可以借鉴的具体 GitHub Actions 示例。
管道架构
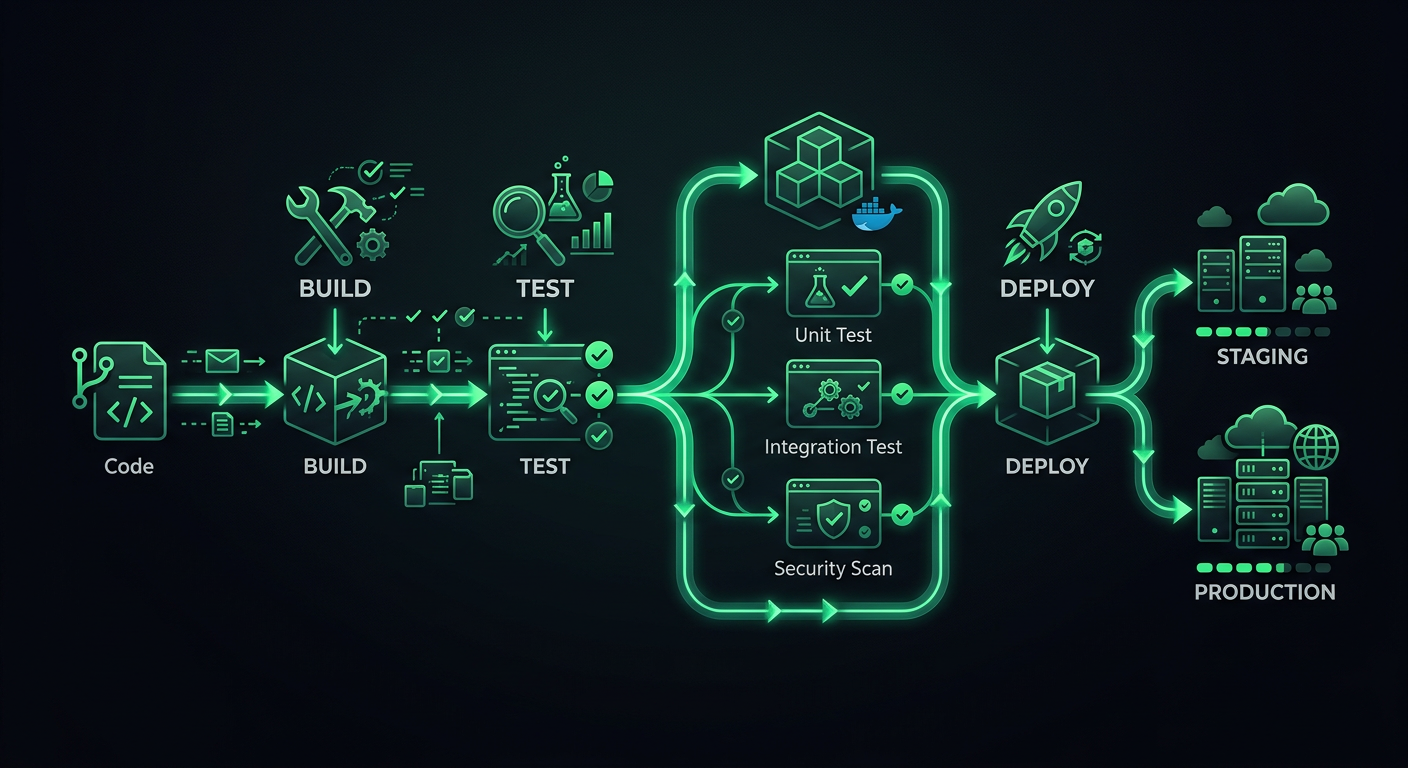
生产管道有不同的阶段,每个阶段都有特定的目的。现在跳过阶段可以节省几分钟,但以后会花费数小时。
阶段
Code Push
  │
  ├─→ Stage 1: Validation (lint, format, type-check)
  │
  ├─→ Stage 2: Testing (unit, integration)
  │
  ├─→ Stage 3: Build (compile, bundle, containerize)
  │
  ├─→ Stage 4: Deploy to Staging
  │
  ├─→ Stage 5: Smoke Tests / E2E on Staging
  │
  └─→ Stage 6: Deploy to Production
每个阶段都充当一个门控。如果验证失败,测试就不会运行。如果测试失败,构建就不会开始。这节省了计算时间并提供了快速反馈——开发人员在 30 秒内就知道他们是否忘记运行 linter,而不是等待 8 分钟才发现测试套件失败。
触发策略
并非每次推送都需要完整的管道。这是我使用的触发器配置:
# .github/workflows/ci.yml
name: CI
on:
  push:
    branches: [main, develop]
  pull_request:
    branches: [main, develop]
    types: [opened, synchronize, reopened]
拉取请求运行阶段 1-3(验证、测试、构建)。合并到 develop 分支会部署到 staging 环境。合并到 main 分支会部署到生产环境。这使得 PR 反馈快速,同时确保部署只发生在受保护的分支。
阶段 1:验证
验证在测试运行之前捕获格式不一致和类型错误。这些检查速度快(30 秒以内),并能捕获最常见的问题。
jobs:
  validate:
    name: Validate
    runs-on: ubuntu-latest
    steps:
      - uses: actions/checkout@v4

      - name: Setup Node.js
        uses: actions/setup-node@v4
        with:
          node-version: 20
          cache: 'npm'

      - name: Install dependencies
        run: npm ci

      - name: Check formatting
        run: npx prettier --check "src/**/*.{ts,tsx,js,jsx,json,css}"

      - name: Lint
        run: npx eslint src/ --max-warnings 0

      - name: Type check
        run: npx tsc --noEmit
--max-warnings 0 规则
ESLint 区分错误(导致进程失败)和警告(不导致进程失败)。如果没有 --max-warnings 0,团队会积累数百个被所有人忽略的警告。在 CI 中将警告视为错误,迫使团队要么修复它们,要么明确禁用该规则。没有中间地带。
将格式化作为 CI 检查,而非仅仅是建议
在 CI 中运行 Prettier(使用 --check 而不是 --write)可以确保一致的格式化,而无需依赖每个开发人员都安装正确的编辑器扩展。如果 CI 中的格式化失败,开发人员会在本地运行 npx prettier --write . 并提交修复。这是不可协商的——当工具做出决定时,格式化争议就结束了。
阶段 2:测试
测试是管道的支柱。我根据类型将测试拆分为并行作业,以实现更快的反馈。
  unit-tests:
    name: Unit Tests
    runs-on: ubuntu-latest
    needs: validate
    steps:
      - uses: actions/checkout@v4

      - name: Setup Node.js
        uses: actions/setup-node@v4
        with:
          node-version: 20
          cache: 'npm'

      - name: Install dependencies
        run: npm ci

      - name: Run unit tests
        run: npx vitest run --coverage --reporter=verbose

      - name: Upload coverage report
        if: always()
        uses: actions/upload-artifact@v4
        with:
          name: coverage-report
          path: coverage/

  integration-tests:
    name: Integration Tests
    runs-on: ubuntu-latest
    needs: validate
    services:
      postgres:
        image: postgres:16
        env:
          POSTGRES_USER: test
          POSTGRES_PASSWORD: test
          POSTGRES_DB: testdb
        ports:
          - 5432:5432
        options: >-
          --health-cmd pg_isready
          --health-interval 10s
          --health-timeout 5s
          --health-retries 5
      redis:
        image: redis:7
        ports:
          - 6379:6379
    steps:
      - uses: actions/checkout@v4

      - name: Setup Node.js
        uses: actions/setup-node@v4
        with:
          node-version: 20
          cache: 'npm'

      - name: Install dependencies
        run: npm ci

      - name: Run database migrations
        run: npx prisma migrate deploy
        env:
          DATABASE_URL: postgresql://test:test@localhost:5432/testdb

      - name: Run integration tests
        run: npx vitest run --config vitest.integration.config.ts
        env:
          DATABASE_URL: postgresql://test:test@localhost:5432/testdb
          REDIS_URL: redis://localhost:6379
用于集成测试的服务容器
GitHub Actions 服务容器未被充分利用。与其在集成测试中模拟数据库(这测试的是模拟,而不是你的代码),不如启动一个真实的 PostgreSQL 实例。services 块处理生命周期管理——容器在测试之前启动,并在测试之后停止。
这会为容器启动增加大约 15-20 秒的作业时间,但通过针对真实数据库进行测试所获得的信心是值得的。
并行测试执行
单元测试和集成测试并行运行(两者都 needs: validate,而不是 needs: unit-tests)。这减少了总管道时间。如果你的单元测试需要 2 分钟,集成测试需要 4 分钟,那么并行执行意味着你等待 4 分钟而不是 6 分钟。
阶段 3:构建
构建阶段验证项目是否编译成功并生成可部署的工件。
  build:
    name: Build
    runs-on: ubuntu-latest
    needs: [unit-tests, integration-tests]
    steps:
      - uses: actions/checkout@v4

      - name: Setup Node.js
        uses: actions/setup-node@v4
        with:
          node-version: 20
          cache: 'npm'

      - name: Install dependencies
        run: npm ci

      - name: Build application
        run: npm run build
        env:
          NODE_ENV: production

      - name: Upload build artifacts
        uses: actions/upload-artifact@v4
        with:
          name: build-output
          path: dist/
          retention-days: 7
构建缓存
对于基于 Docker 的部署,层缓存显著加快了构建速度:
  build-docker:
    name: Build Docker Image
    runs-on: ubuntu-latest
    needs: [unit-tests, integration-tests]
    steps:
      - uses: actions/checkout@v4

      - name: Set up Docker Buildx
        uses: docker/setup-buildx-action@v3

      - name: Login to Container Registry
        uses: docker/login-action@v3
        with:
          registry: ghcr.io
          username: ${{ github.actor }}
          password: ${{ secrets.GITHUB_TOKEN }}

      - name: Build and push
        uses: docker/build-push-action@v6
        with:
          context: .
          push: ${{ github.event_name != 'pull_request' }}
          tags: |
            ghcr.io/${{ github.repository }}:${{ github.sha }}
            ghcr.io/${{ github.repository }}:latest
          cache-from: type=gha
          cache-to: type=gha,mode=max
cache-from: type=gha 使用 GitHub Actions 缓存来存储 Docker 层,以便在不同运行之间复用。对于典型的 Node.js 应用程序,这可以将仅依赖项更改的构建时间从 3-4 分钟减少到 30-60 秒。
CI 的 Dockerfile 最佳实践
Dockerfile 结构直接影响构建缓存效率。按照从不常更改到最常更改的顺序排列层:
FROM node:20-alpine AS base

# System dependencies (rarely changes)
RUN apk add --no-cache libc6-compat

# Package manifests (changes when dependencies change)
WORKDIR /app
COPY package.json package-lock.json ./

# Install dependencies (cached unless manifests change)
FROM base AS deps
RUN npm ci --production

FROM base AS build
RUN npm ci
COPY . .
RUN npm run build

# Production image
FROM node:20-alpine AS runner
WORKDIR /app
ENV NODE_ENV=production

COPY --from=deps /app/node_modules ./node_modules
COPY --from=build /app/dist ./dist
COPY --from=build /app/package.json ./

EXPOSE 3000
CMD ["node", "dist/server.js"]
多阶段构建使最终镜像保持较小(没有开发依赖项,没有源代码),并且层排序确保 npm ci 仅在 package.json 或 package-lock.json 更改时运行。
阶段 4:部署到预生产环境
预生产环境部署会在合并到 develop 分支时自动进行。预生产环境应尽可能地模拟生产环境——相同的基础设施、相同的环境变量(但值不同)、相同的扩展配置。
  deploy-staging:
    name: Deploy to Staging
    runs-on: ubuntu-latest
    needs: build
    if: github.ref == 'refs/heads/develop' && github.event_name == 'push'
    environment:
      name: staging
      url: https://staging.example.com
    steps:
      - uses: actions/checkout@v4

      - name: Download build artifacts
        uses: actions/download-artifact@v4
        with:
          name: build-output
          path: dist/

      - name: Deploy to Cloud Run (Staging)
        uses: google-github-actions/deploy-cloudrun@v2
        with:
          service: my-api-staging
          region: us-central1
          image: ghcr.io/${{ github.repository }}:${{ github.sha }}
          env_vars: |
            NODE_ENV=staging
            DATABASE_URL=${{ secrets.STAGING_DATABASE_URL }}
GitHub 环境
工作流中的 environment 键启用了 GitHub 的环境保护规则。你可以要求手动批准、限制哪些分支可以部署,并设置特定于环境的秘密。对于预生产环境,我通常不需要批准(自动部署)。对于生产环境,我至少需要一名审查员。
阶段 5:冒烟测试
部署到预生产环境后,对已部署的应用程序运行一组基本测试,以验证它在真实环境中是否实际工作。
  smoke-tests:
    name: Smoke Tests
    runs-on: ubuntu-latest
    needs: deploy-staging
    steps:
      - uses: actions/checkout@v4

      - name: Setup Node.js
        uses: actions/setup-node@v4
        with:
          node-version: 20
          cache: 'npm'

      - name: Install dependencies
        run: npm ci

      - name: Wait for deployment
        run: |
          for i in {1..30}; do
            status=$(curl -s -o /dev/null -w "%{http_code}" https://staging.example.com/health)
            if [ "$status" = "200" ]; then
              echo "Service is healthy"
              exit 0
            fi
            echo "Waiting for service... (attempt $i)"
            sleep 10
          done
          echo "Service did not become healthy"
          exit 1

      - name: Run smoke tests
        run: npx playwright test --config=playwright.smoke.config.ts
        env:
          BASE_URL: https://staging.example.com
冒烟测试不是完整的端到端测试。它们验证关键路径:主页是否可以加载,用户是否可以登录,主 API 端点是否返回数据。通常是五到十个场景,耗时不到 2 分钟。如果冒烟测试失败,预生产环境部署将被回滚,并且生产环境部署不会继续。
阶段 6:生产环境部署
生产环境部署是部署策略最重要的环节。有几种方法,每种方法都有不同的权衡。
滚动部署
最简单的策略。新实例启动,同时旧实例被逐渐淘汰。在部署期间的任何时候,一些请求会命中旧版本,一些请求会命中新版本。这是大多数容器平台的默认设置。
优点: 简单,没有额外的基础设施成本。 缺点: 两个版本同时处理流量,这可能会导致数据库 schema 更改或 API 契约更改的问题。
蓝绿部署
存在两个相同的环境(蓝色和绿色)。一个环境处理流量,另一个环境处于空闲状态。部署到空闲环境,验证其工作正常,然后切换路由器。如果出现问题,则切换回来。
  deploy-production:
    name: Deploy to Production
    runs-on: ubuntu-latest
    needs: smoke-tests
    if: github.ref == 'refs/heads/main' && github.event_name == 'push'
    environment:
      name: production
      url: https://api.example.com
    steps:
      - name: Deploy new revision
        uses: google-github-actions/deploy-cloudrun@v2
        with:
          service: my-api-production
          region: us-central1
          image: ghcr.io/${{ github.repository }}:${{ github.sha }}
          flags: '--no-traffic'

      - name: Run production health check
        run: |
          REVISION_URL=$(gcloud run revisions describe my-api-production-${{ github.sha }} \
            --region us-central1 --format='value(status.url)')
          status=$(curl -s -o /dev/null -w "%{http_code}" "$REVISION_URL/health")
          if [ "$status" != "200" ]; then
            echo "Health check failed"
            exit 1
          fi

      - name: Migrate traffic
        run: |
          gcloud run services update-traffic my-api-production \
            --region us-central1 \
            --to-latest
--no-traffic 标志部署新版本,但不向其发送任何流量。健康检查通过后,流量会转移到新版本。如果健康检查失败,工作流将停止,旧版本将继续提供服务。
金丝雀部署
将一小部分流量(5-10%)路由到新版本,同时监控错误率、延迟和关键业务指标。如果在指定时间段后指标看起来良好,则逐渐增加流量。如果指标恶化,则回滚。
      - name: Canary - route 10% of traffic
        run: |
          gcloud run services update-traffic my-api-production \
            --region us-central1 \
            --to-revisions=my-api-production-${{ github.sha }}=10

      - name: Monitor canary (5 minutes)
        run: |
          sleep 300
          # Check error rate for the canary revision
          ERROR_RATE=$(curl -s "$MONITORING_API/error-rate?revision=${{ github.sha }}")
          if (( $(echo "$ERROR_RATE > 1.0" | bc -l) )); then
            echo "Error rate too high: $ERROR_RATE%. Rolling back."
            gcloud run services update-traffic my-api-production \
              --region us-central1 \
              --to-latest
            exit 1
          fi

      - name: Promote canary to 100%
        run: |
          gcloud run services update-traffic my-api-production \
            --region us-central1 \
            --to-latest
何时使用金丝雀部署: 当你有足够的流量,以至于 10% 的流量仍然能产生具有统计意义的错误率时。对于每分钟处理 100 个请求的服务,10% 的流量意味着每分钟 10 个请求——这足以在几分钟内检测到升高的错误率。对于每分钟处理 10 个请求的服务,金丝雀部署没有意义。
回滚机制
每次部署都必须有记录在案的回滚路径。“重新部署旧版本”是一种回滚策略,但它很慢。更好的选择:
通过流量切换实现即时回滚
如果你使用 --no-traffic 进行部署并切换流量,回滚只需一个命令:
# Roll back to the previous revision
gcloud run services update-traffic my-api-production \
  --region us-central1 \
  --to-revisions=PREVIOUS_REVISION=100
这会在几秒钟内生效,因为旧版本仍在运行。
自动化回滚
添加一个部署后监控步骤,如果错误率飙升,则自动回滚:
      - name: Post-deploy monitor
        run: |
          for i in {1..10}; do
            sleep 60
            ERROR_RATE=$(curl -s "$MONITORING_API/error-rate?window=5m")
            if (( $(echo "$ERROR_RATE > 2.0" | bc -l) )); then
              echo "Error rate $ERROR_RATE% exceeds threshold. Rolling back."
              gcloud run services update-traffic my-api-production \
                --region us-central1 \
                --to-revisions=$PREVIOUS_REVISION=100
              exit 1
            fi
            echo "Minute $i: Error rate $ERROR_RATE% — OK"
          done
数据库迁移回滚
这是最困难的部分。如果你的部署包含数据库 schema 更改,在不回滚数据库的情况下回滚应用程序会造成不匹配。解决方案是扩展-收缩迁移:
- 扩展: 添加新列/表而不删除旧列/表。使新列可为空或带有默认值。
- 部署: 新代码同时写入旧列和新列。从新列读取,并回退到旧列。
- 迁移数据: 从旧数据回填新列。
- 收缩: 验证后,部署只使用新列的代码。然后删除旧列。
这使得每个步骤都可以独立地进行回滚。
秘密管理
永远不要硬编码秘密。永远不要提交 .env 文件。以下是我在 GitHub Actions 中处理秘密的方式:
GitHub 秘密
在大多数情况下,GitHub 内置的秘密就足够了。它们经过加密,永远不会在日志中暴露,并且作用域限定在仓库或组织。
env:
  DATABASE_URL: ${{ secrets.DATABASE_URL }}
  API_KEY: ${{ secrets.API_KEY }}
环境范围的秘密
预生产环境和生产环境的不同秘密:
deploy-staging:
  environment: staging
  # ${{ secrets.DATABASE_URL }} resolves to the staging value

deploy-production:
  environment: production
  # ${{ secrets.DATABASE_URL }} resolves to the production value
外部秘密管理器
对于大型团队或更严格的合规性要求,请使用 AWS Secrets Manager、Google Secret Manager 或 HashiCorp Vault。应用程序在运行时获取秘密,而不是通过环境变量接收它们。
import { SecretManagerServiceClient } from '@google-cloud/secret-manager';

const client = new SecretManagerServiceClient();

async function getSecret(name: string): Promise<string> {
  const [version] = await client.accessSecretVersion({
    name: `projects/my-project/secrets/${name}/versions/latest`,
  });
  return version.payload?.data?.toString() || '';
}
监控部署
部署并非在代码上线时完成。它在您确认代码正常工作时才算完成。
部署通知
将部署事件发送到 Slack,并附带相关上下文:
      - name: Notify Slack
        if: always()
        uses: slackapi/slack-github-action@v2
        with:
          webhook: ${{ secrets.SLACK_WEBHOOK }}
          webhook-type: incoming-webhook
          payload: |
            {
              "text": "${{ job.status == 'success' && 'Deployed' || 'Failed to deploy' }} `${{ github.sha }}` to production",
              "blocks": [
                {
                  "type": "section",
                  "text": {
                    "type": "mrkdwn",
                    "text": "*${{ job.status == 'success' && ':white_check_mark: Deployment Successful' || ':x: Deployment Failed' }}*\nCommit: `${{ github.sha }}`\nAuthor: ${{ github.actor }}\nMessage: ${{ github.event.head_commit.message }}"
                  }
                }
              ]
            }
部署后健康检查
每次生产部署后,验证关键端点是否正确响应:
      - name: Verify production health
        run: |
          endpoints=("/" "/api/health" "/api/v1/status")
          for endpoint in "${endpoints[@]}"; do
            status=$(curl -s -o /dev/null -w "%{http_code}" "https://api.example.com$endpoint")
            if [ "$status" != "200" ]; then
              echo "FAILED: $endpoint returned $status"
              exit 1
            fi
            echo "OK: $endpoint returned $status"
          done
一个完整的管道示例
综合来看,这是一个部署到 Cloud Run 的 Node.js 应用程序的精简但完整的管道:
name: CI/CD Pipeline
on:
  push:
    branches: [main, develop]
  pull_request:
    branches: [main, develop]

concurrency:
  group: ${{ github.workflow }}-${{ github.ref }}
  cancel-in-progress: ${{ github.event_name == 'pull_request' }}

jobs:
  validate:
    runs-on: ubuntu-latest
    steps:
      - uses: actions/checkout@v4
      - uses: actions/setup-node@v4
        with: { node-version: 20, cache: 'npm' }
      - run: npm ci
      - run: npx prettier --check "src/**/*.{ts,tsx}"
      - run: npx eslint src/ --max-warnings 0
      - run: npx tsc --noEmit

  test:
    needs: validate
    runs-on: ubuntu-latest
    services:
      postgres:
        image: postgres:16
        env: { POSTGRES_USER: test, POSTGRES_PASSWORD: test, POSTGRES_DB: testdb }
        ports: ['5432:5432']
        options: --health-cmd pg_isready --health-interval 10s --health-timeout 5s --health-retries 5
    steps:
      - uses: actions/checkout@v4
      - uses: actions/setup-node@v4
        with: { node-version: 20, cache: 'npm' }
      - run: npm ci
      - run: npx vitest run --coverage
        env:
          DATABASE_URL: postgresql://test:test@localhost:5432/testdb

  build-and-push:
    needs: test
    if: github.event_name == 'push'
    runs-on: ubuntu-latest
    steps:
      - uses: actions/checkout@v4
      - uses: docker/setup-buildx-action@v3
      - uses: docker/login-action@v3
        with:
          registry: ghcr.io
          username: ${{ github.actor }}
          password: ${{ secrets.GITHUB_TOKEN }}
      - uses: docker/build-push-action@v6
        with:
          context: .
          push: true
          tags: ghcr.io/${{ github.repository }}:${{ github.sha }}
          cache-from: type=gha
          cache-to: type=gha,mode=max

  deploy:
    needs: build-and-push
    runs-on: ubuntu-latest
    environment:
      name: ${{ github.ref == 'refs/heads/main' && 'production' || 'staging' }}
    steps:
      - uses: google-github-actions/auth@v2
        with:
          credentials_json: ${{ secrets.GCP_SA_KEY }}
      - uses: google-github-actions/deploy-cloudrun@v2
        with:
          service: my-api-${{ github.ref == 'refs/heads/main' && 'prod' || 'staging' }}
          region: us-central1
          image: ghcr.io/${{ github.repository }}:${{ github.sha }}
concurrency 块值得注意——它会取消同一分支上拉取请求的正在进行的运行,因此在 CI 仍在运行时推送修复不会排队两个管道。
如果重来,我会怎么做
如果我今天从头开始设置管道,我只会从验证和测试阶段开始——不进行部署自动化。在前几周,当代码库稳定下来时,手动发布(或使用简单的部署脚本)。一旦手动过程成为瓶颈,而不是在此之前,再添加部署自动化。过早的管道优化就像过早的代码优化一样真实,而且在凌晨 2 点调试一个损坏的部署管道比手动运行 ./deploy.sh 要糟糕得多。