멀티테넌시 아키텍처 패턴: 기본을 넘어서
SaaS 플랫폼을 위한 고급 멀티테넌트 아키텍처 패턴 — 데이터 격리 전략부터 테넌트별 맞춤 설정 및 확장에 이르기까지.
대부분의 멀티테넌시 가이드는 "tenant_id 열을 추가하고 쿼리를 필터링하세요"에서 멈춥니다. 이 정도면 처음 몇 달은 버틸 수 있습니다. 하지만 데이터가 10배 많은 테넌트가 다른 모든 사용자의 성능을 저하시키기 시작하고, 엔터프라이즈 잠재 고객이 화이트 라벨링에 대해 묻고, 파트너가 자체 결제 처리기를 통합하고 싶어 합니다. 갑자기 기본만으로는 충분하지 않게 됩니다.
이 게시물에서는 쿼리 범위 지정을 넘어선, 프로덕션 멀티테넌트 시스템에서 제가 구현했던 패턴들을 다룹니다. 이것들은 프로토타입과 플랫폼을 구분하는 아키텍처 결정들입니다.
고급 격리 패턴
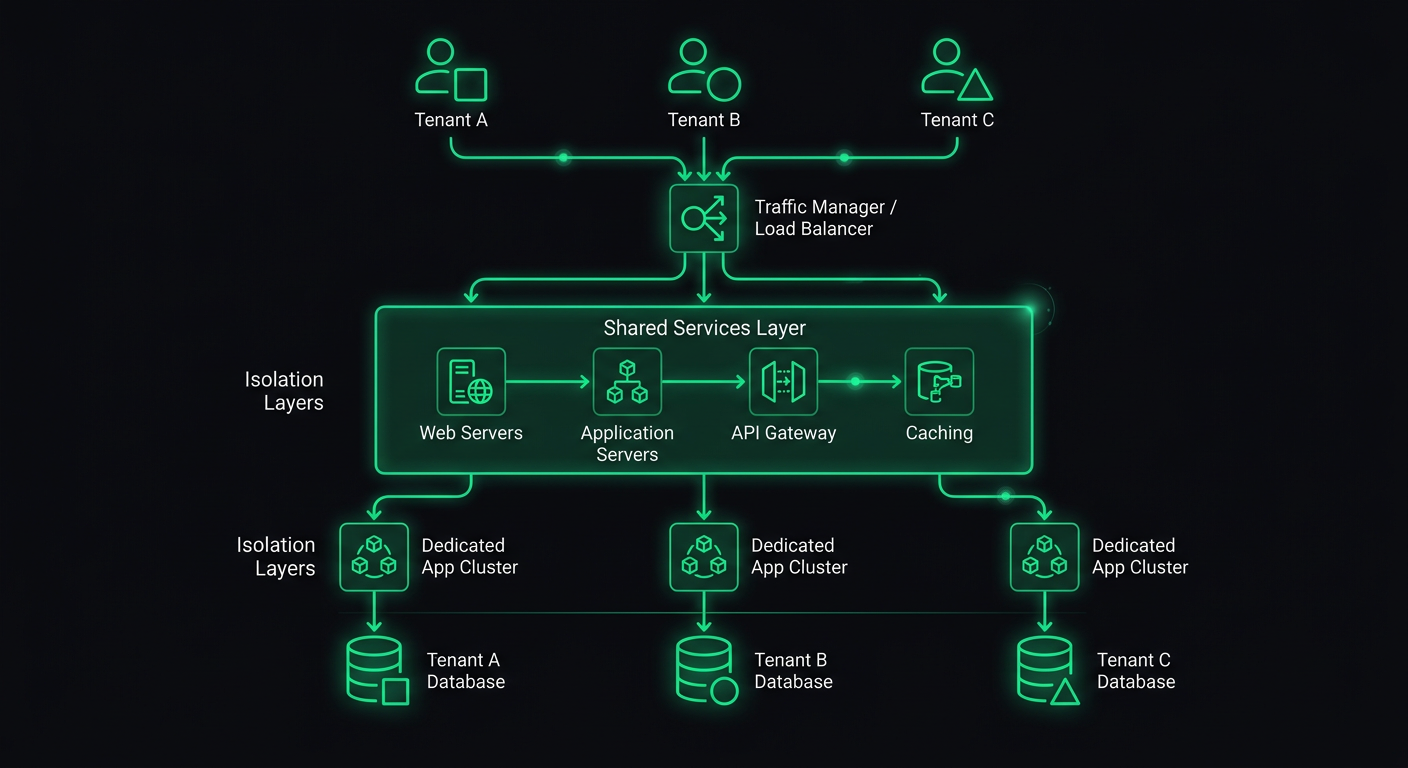
공유 데이터베이스, 테넌트별 스키마, 테넌트별 데이터베이스의 3계층 모델은 잘 알려져 있습니다. 덜 논의되는 것은 대부분의 프로덕션 시스템이 실제로 사용하게 되는 하이브리드 접근 방식입니다.
고객 세그먼트별 계층형 격리
실제로 하나의 격리 수준을 선택하여 일률적으로 적용하는 경우는 드뭅니다. 대신, 각 고객 세그먼트가 필요로 하고 기꺼이 지불할 의사가 있는 것에 따라 격리 수준을 계층화합니다.
interface TenantConfig {
  id: string;
  slug: string;
  isolationLevel: "shared" | "schema" | "dedicated";
  databaseUrl?: string; // only for dedicated tenants
  schemaName?: string;  // only for schema-isolated tenants
}

function getConnectionForTenant(tenant: TenantConfig) {
  switch (tenant.isolationLevel) {
    case "shared":
      return getSharedPool();
    case "schema":
      return getSchemaConnection(tenant.schemaName!);
    case "dedicated":
      return getDedicatedConnection(tenant.databaseUrl!);
  }
}
공유 계층은 셀프 서비스 고객에게 서비스를 제공합니다. 스키마 격리는 규정 준수 문서를 필요로 하는 중견 시장 고객에게 서비스를 제공합니다. 전용 데이터베이스는 물리적 데이터 분리를 요구하는 엔터프라이즈 계정에 서비스를 제공합니다.
핵심 설계 제약 사항: 애플리케이션 코드는 테넌트가 어떤 계층에 있는지 알거나 신경 쓰지 않아야 합니다. 연결 해결은 미들웨어에서 발생하며, 모든 다운스트림은 동일한 쿼리 인터페이스를 사용합니다. 라우트 핸들러가 데이터를 쿼리하는 방법을 결정하기 위해 격리 수준을 확인해야 한다면, 추상화가 누수되고 있는 것입니다.
안전망으로서의 행 수준 보안 (Row-Level Security)
PostgreSQL의 행 수준 보안(Row-Level Security, RLS)은 멀티테넌트 아키텍처에서 가장 활용도가 낮은 기능 중 하나입니다. 애플리케이션 계층에서 쿼리 범위 지정을 엄격하게 하더라도, RLS는 한 테넌트가 다른 테넌트의 데이터에 접근할 수 없도록 데이터베이스 수준의 보장을 제공합니다.
ALTER TABLE orders ENABLE ROW LEVEL SECURITY;

CREATE POLICY tenant_isolation ON orders
  USING (tenant_id = current_setting('app.current_tenant')::uuid);

ALTER TABLE orders FORCE ROW LEVEL SECURITY;
연결 수준에서는 쿼리를 실행하기 전에 테넌트 컨텍스트를 설정합니다.
async function withTenantContext<T>(
  tenantId: string,
  callback: (client: PoolClient) => Promise<T>
): Promise<T> {
  const client = await pool.connect();
  try {
    await client.query("SET app.current_tenant = $1", [tenantId]);
    return await callback(client);
  } finally {
    await client.query("RESET app.current_tenant");
    client.release();
  }
}
이것이 적용되면, 애플리케이션 코드에 WHERE tenant_id = ? 절을 생략하는 버그가 있더라도 데이터베이스 자체가 결과를 필터링합니다. 이것은 프로덕션에서 실제 버그를 잡아냈습니다. 한 개발자가 테이블 간 조인을 하는 보고서 쿼리를 작성하고 그 중 하나에 테넌트 필터를 누락했는데, RLS는 데이터 유출 없이 올바른 행만 조용히 반환했습니다.
FORCE ROW LEVEL SECURITY는 중요합니다. 이것이 없으면 테이블 소유자(일반적으로 애플리케이션이 사용하는 역할)는 RLS 정책을 우회합니다. 이것이 있으면 정책이 모든 사람에게 적용됩니다.
테넌트 인식 미들웨어 파이프라인
이전 멀티테넌트 백엔드 게시물에서 다루었던 테넌트 해결 미들웨어는 기본 사항을 처리합니다: 서브도메인 또는 JWT에서 테넌트를 추출하여 요청에 첨부합니다. 그러나 프로덕션 시스템은 완전한 테넌트 컨텍스트를 구축하는 더 풍부한 미들웨어 파이프라인을 필요로 합니다.
interface TenantContext {
  id: string;
  slug: string;
  config: TenantConfig;
  plan: PlanTier;
  features: Set<string>;
  limits: TenantLimits;
  branding?: TenantBranding;
}

async function buildTenantContext(tenantId: string): Promise<TenantContext> {
  // Cache this aggressively — it's read on every request
  const cacheKey = `tenant:${tenantId}:context`;
  const cached = await redis.get(cacheKey);
  if (cached) return JSON.parse(cached);

  const [tenant, plan, features, limits, branding] = await Promise.all([
    db("tenants").where({ id: tenantId }).first(),
    db("tenant_plans").where({ tenant_id: tenantId, active: true }).first(),
    db("tenant_features").where({ tenant_id: tenantId, enabled: true }).select("feature_key"),
    db("tenant_limits").where({ tenant_id: tenantId }).first(),
    db("tenant_branding").where({ tenant_id: tenantId }).first(),
  ]);

  const context: TenantContext = {
    id: tenant.id,
    slug: tenant.slug,
    config: tenant.config,
    plan: plan.tier,
    features: new Set(features.map((f) => f.feature_key)),
    limits: limits ?? DEFAULT_LIMITS,
    branding: branding ?? undefined,
  };

  await redis.set(cacheKey, JSON.stringify(context), "EX", 300);
  return context;
}
미들웨어는 이 전체 컨텍스트를 요청에 첨부합니다.
export async function tenantContextMiddleware(
  req: Request,
  res: Response,
  next: NextFunction
) {
  if (!req.tenantId) return next();

  try {
    req.tenantContext = await buildTenantContext(req.tenantId);

    // Check if tenant is active
    if (req.tenantContext.config.status === "suspended") {
      return res.status(403).json({
        error: "Account suspended",
        reason: req.tenantContext.config.suspensionReason,
      });
    }

    next();
  } catch (error) {
    next(error);
  }
}
이제 모든 다운스트림 핸들러는 추가 데이터베이스 호출 없이 전체 테넌트 컨텍스트에 접근할 수 있습니다. 5분 캐시는 플랜 변경이 빠르게 전파되도록 하지만, 기능이 활성화되었는지 확인하기 위해 모든 요청에서 데이터베이스를 호출하지는 않습니다.
테넌트별 동적 구성
기능 플래그 외에도 테넌트는 종종 구성 가능한 동작을 필요로 합니다. 레스토랑 플랫폼은 각 레스토랑이 자체 주문 마감 시간, 세금율, 배달 구역 및 알림 기본 설정을 설정하도록 허용할 수 있습니다. 프로젝트 관리 도구는 각 작업 공간이 사용자 정의 필드, 워크플로 단계 및 알림 규칙을 구성하도록 허용할 수 있습니다.
제가 사용하는 패턴은 구성을 스키마 유효성 검사가 적용된 JSON 열로 분리하는 것입니다.
import { z } from "zod";

const TenantSettingsSchema = z.object({
  timezone: z.string().default("UTC"),
  locale: z.string().default("en"),
  currency: z.string().default("USD"),
  notifications: z.object({
    emailDigest: z.enum(["daily", "weekly", "never"]).default("daily"),
    slackWebhook: z.string().url().optional(),
    webhookUrl: z.string().url().optional(),
  }).default({}),
  limits: z.object({
    maxUsersOverride: z.number().optional(),
    maxStorageMbOverride: z.number().optional(),
    apiRateLimitOverride: z.number().optional(),
  }).default({}),
  customFields: z.array(z.object({
    key: z.string(),
    label: z.string(),
    type: z.enum(["text", "number", "date", "select"]),
    options: z.array(z.string()).optional(),
    required: z.boolean().default(false),
  })).default([]),
});

type TenantSettings = z.infer<typeof TenantSettingsSchema>;
설정은 PostgreSQL에 JSONB로 저장되어 스키마를 유연하게 유지하면서 인덱싱 및 쿼리 기능을 제공합니다.
async function getTenantSettings(tenantId: string): Promise<TenantSettings> {
  const row = await db("tenant_settings")
    .where({ tenant_id: tenantId })
    .first();

  return TenantSettingsSchema.parse(row?.settings ?? {});
}

async function updateTenantSettings(
  tenantId: string,
  updates: Partial<TenantSettings>
): Promise<TenantSettings> {
  const current = await getTenantSettings(tenantId);
  const merged = { ...current, ...updates };
  const validated = TenantSettingsSchema.parse(merged);

  await db("tenant_settings")
    .insert({
      tenant_id: tenantId,
      settings: validated,
      updated_at: new Date(),
    })
    .onConflict("tenant_id")
    .merge();

  // Invalidate cache
  await redis.del(`tenant:${tenantId}:context`);

  return validated;
}
Zod 스키마는 두 가지 역할을 합니다. 쓰기 시 설정을 검증하고 읽기 시 기본값을 제공합니다. 새 설정을 추가하면 기존 테넌트는 데이터 마이그레이션 없이 자동으로 기본값을 얻습니다.
테넌트별 기능 플래그
단순한 부울 플래그만으로는 성숙한 플랫폼에 충분하지 않습니다. 백분율 롤아웃, 플랜 기반 게이팅, 테넌트별 재정의에 대한 지원이 필요합니다.
interface FeatureFlag {
  key: string;
  defaultEnabled: boolean;
  rolloutPercentage: number; // 0-100
  planMinimum?: PlanTier;
  tenantOverrides: Map<string, boolean>; // explicit per-tenant overrides
}

class FeatureFlagService {
  private flags: Map<string, FeatureFlag>;

  constructor(private cache: CacheStore) {
    this.flags = new Map();
  }

  async isEnabled(tenantId: string, featureKey: string): Promise<boolean> {
    const flag = await this.getFlag(featureKey);
    if (!flag) return false;

    // Explicit per-tenant override takes precedence
    if (flag.tenantOverrides.has(tenantId)) {
      return flag.tenantOverrides.get(tenantId)!;
    }

    // Plan-based gating
    if (flag.planMinimum) {
      const tenantPlan = await this.getTenantPlan(tenantId);
      if (planRank(tenantPlan) < planRank(flag.planMinimum)) {
        return false;
      }
    }

    // Percentage rollout — deterministic based on tenant ID
    if (flag.rolloutPercentage < 100) {
      const hash = this.hashTenantFeature(tenantId, featureKey);
      return hash % 100 < flag.rolloutPercentage;
    }

    return flag.defaultEnabled;
  }

  private hashTenantFeature(tenantId: string, featureKey: string): number {
    const str = `${tenantId}:${featureKey}`;
    let hash = 0;
    for (let i = 0; i < str.length; i++) {
      hash = ((hash << 5) - hash + str.charCodeAt(i)) | 0;
    }
    return Math.abs(hash);
  }
}
결정론적 해시는 롤아웃에 중요합니다. 테넌트는 기능을 일관되게 보거나 보지 않아야 합니다. 한 요청에서는 보고 다음 요청에서는 보지 않는 것을 원하지 않습니다. 해시는 테넌트 ID와 기능 키에서 계산되므로, 다른 기능이 다른 테넌트 하위 집합에 롤아웃될 수 있습니다.
라우트 핸들러에서 확인은 깔끔합니다.
app.get("/api/v2/analytics", async (req, res) => {
  const useNewAnalytics = await featureFlags.isEnabled(
    req.tenantId,
    "analytics_v2"
  );

  if (useNewAnalytics) {
    return res.json(await analyticsV2.getDashboard(req.tenantId));
  }

  return res.json(await analyticsV1.getDashboard(req.tenantId));
});
테넌트별 통합
엔터프라이즈 테넌트는 자체 도구를 연결하기를 원할 것입니다. 결제 처리를 위한 자체 Stripe 계정, 이메일을 위한 자체 SendGrid 계정, 파일 저장을 위한 자체 S3 버킷 등입니다. 플랫폼은 구성 악몽으로 변하지 않고 이를 지원해야 합니다.
이 패턴은 테넌트별로 올바른 자격 증명을 해결하는 통합 레지스트리입니다.
interface IntegrationConfig {
  provider: string;
  credentials: Record<string, string>; // encrypted at rest
  settings: Record<string, unknown>;
  isCustom: boolean; // true = tenant's own account, false = platform default
}

class IntegrationRegistry {
  async getIntegration(
    tenantId: string,
    integrationType: "email" | "payment" | "storage" | "sms"
  ): Promise<IntegrationConfig> {
    // Check for tenant-specific integration first
    const custom = await db("tenant_integrations")
      .where({ tenant_id: tenantId, type: integrationType, active: true })
      .first();

    if (custom) {
      return {
        provider: custom.provider,
        credentials: await decrypt(custom.encrypted_credentials),
        settings: custom.settings,
        isCustom: true,
      };
    }

    // Fall back to platform defaults
    return this.getPlatformDefault(integrationType);
  }
}
서비스 계층은 레지스트리를 사용하여 올바른 클라이언트를 가져옵니다.
class EmailService {
  constructor(private integrations: IntegrationRegistry) {}

  async sendEmail(tenantId: string, email: EmailPayload): Promise<void> {
    const config = await this.integrations.getIntegration(tenantId, "email");

    const client = this.createClient(config);
    await client.send({
      from: config.settings.fromAddress as string,
      ...email,
    });
  }

  private createClient(config: IntegrationConfig): EmailClient {
    switch (config.provider) {
      case "sendgrid":
        return new SendGridClient(config.credentials.apiKey);
      case "ses":
        return new SESClient(config.credentials);
      case "resend":
        return new ResendClient(config.credentials.apiKey);
      default:
        throw new Error(`Unknown email provider: ${config.provider}`);
    }
  }
}
이는 한 테넌트가 플랫폼의 공유 SendGrid 계정을 사용하는 동안 다른 테넌트는 자체 도메인과 평판을 가진 자체 Amazon SES 인스턴스를 사용할 수 있음을 의미합니다. 나머지 애플리케이션 코드는 알거나 신경 쓰지 않습니다. emailService.sendEmail()을 호출하면 통합 계층이 라우팅을 처리합니다.
여기서 자격 증명 보안은 협상 불가능합니다. 테넌트가 제공한 API 키는 저장 시 암호화되어야 하며, 가급적 테넌트별 암호화 키를 사용하는 것이 좋습니다. AWS KMS 또는 HashiCorp Vault와 같은 것을 사용하여 이를 관리하세요. 자체 암호화 키 관리를 구현하지 마세요.
격리 수준 간 데이터 마이그레이션
멀티테넌트 시스템에서 가장 까다로운 운영 과제 중 하나는 테넌트를 한 격리 수준에서 다른 격리 수준으로 마이그레이션하는 것입니다. 성장하는 테넌트는 공유 테이블에서 자체 스키마로 이동할 수 있습니다. 엔터프라이즈 계약은 테넌트를 전용 데이터베이스로 마이그레이션해야 할 수 있습니다.
마이그레이션은 무중단이어야 합니다. 즉, 단순히 덤프하고 복원할 수 없습니다. 제가 사용하는 패턴은 다음과 같습니다.
interface TenantMigration {
  tenantId: string;
  fromLevel: IsolationLevel;
  toLevel: IsolationLevel;
  status: "pending" | "syncing" | "verifying" | "cutover" | "complete" | "failed";
  startedAt: Date;
  completedAt?: Date;
}

class TenantMigrator {
  async migrateToSchema(tenantId: string): Promise<void> {
    const migration = await this.createMigration(tenantId, "shared", "schema");

    try {
      // 1. Create the target schema with all tables
      await this.createSchema(tenantId);
      await this.updateStatus(migration, "syncing");

      // 2. Copy existing data to the new schema
      await this.copyData(tenantId, "public", `tenant_${tenantId}`);

      // 3. Set up Change Data Capture to sync ongoing writes
      const cdcStream = await this.startCDC(tenantId, "public", `tenant_${tenantId}`);

      // 4. Verify data consistency
      await this.updateStatus(migration, "verifying");
      const isConsistent = await this.verifyConsistency(tenantId);
      if (!isConsistent) throw new Error("Data consistency check failed");

      // 5. Cutover: update tenant config to point to new schema
      await this.updateStatus(migration, "cutover");
      await db("tenants").where({ id: tenantId }).update({
        isolation_level: "schema",
        schema_name: `tenant_${tenantId}`,
      });

      // 6. Invalidate caches
      await redis.del(`tenant:${tenantId}:context`);

      // 7. Stop CDC and clean up source data
      await cdcStream.stop();
      await this.cleanupSourceData(tenantId, "public");

      await this.updateStatus(migration, "complete");
    } catch (error) {
      await this.updateStatus(migration, "failed");
      await this.rollback(migration);
      throw error;
    }
  }
}
변경 데이터 캡처(Change Data Capture, CDC) 단계는 매우 중요합니다. 초기 데이터를 복사하고 컷오버를 수행하는 동안 공유 테이블에 새로운 쓰기 작업이 발생합니다. CDC는 이러한 쓰기 작업을 캡처하여 새 스키마에 재생하므로 아무것도 손실되지 않습니다.
실제로 저는 이를 위해 PostgreSQL 논리적 복제를 사용합니다. tenant_id로 필터링된 소스 테이블에 publication을 생성하고, 대상 스키마에 subscription을 생성합니다. 복제 지연이 거의 0이 되면 컷오버를 수행합니다.
롤백 경로도 똑같이 중요합니다. 마이그레이션 중에 어떤 문제가 발생하면 모든 것을 깔끔하게 되돌릴 수 있어야 합니다. 이는 마이그레이션이 확인되고 테넌트가 일정 기간(저는 일반적으로 소스 데이터를 정리하기 전에 48시간을 기다립니다) 동안 새 스키마에서 작동할 때까지 소스 데이터를 그대로 유지해야 함을 의미합니다.
테넌트별 모니터링 및 관찰 가능성
멀티테넌트 시스템에서 "API가 느리다"는 것은 실행 가능한 정보가 아닙니다. 어떤 테넌트가 영향을 받는지, 어떤 쿼리가 느린지, 그리고 문제가 테넌트별(시끄러운 이웃, 대규모 데이터셋)인지 플랫폼 전체적인 문제인지 알아야 합니다.
import { metrics } from "./lib/metrics"; // Prometheus, Datadog, etc.

function tenantMetricsMiddleware(req: Request, res: Response, next: NextFunction) {
  const start = Date.now();

  res.on("finish", () => {
    const duration = Date.now() - start;
    const labels = {
      tenant_id: req.tenantId,
      method: req.method,
      route: req.route?.path ?? "unknown",
      status: String(res.statusCode),
    };

    metrics.histogram("http_request_duration_ms", duration, labels);
    metrics.counter("http_requests_total", 1, labels);

    // Alert on tenant-specific degradation
    if (duration > 2000) {
      metrics.counter("http_slow_requests_total", 1, labels);
    }
  });

  next();
}
요청 수준 메트릭 외에도 테넌트별 리소스 소비를 추적합니다.
interface TenantUsageMetrics {
  tenantId: string;
  period: string; // "2026-03"
  apiCalls: number;
  storageBytes: number;
  bandwidthBytes: number;
  computeMs: number;
  activeUsers: number;
}

class UsageTracker {
  async recordAPICall(tenantId: string, durationMs: number): Promise<void> {
    const period = this.getCurrentPeriod();
    await redis.hincrby(`usage:${tenantId}:${period}`, "apiCalls", 1);
    await redis.hincrby(`usage:${tenantId}:${period}`, "computeMs", durationMs);
  }

  async getUsage(tenantId: string, period: string): Promise<TenantUsageMetrics> {
    const data = await redis.hgetall(`usage:${tenantId}:${period}`);
    return {
      tenantId,
      period,
      apiCalls: parseInt(data.apiCalls ?? "0"),
      storageBytes: parseInt(data.storageBytes ?? "0"),
      bandwidthBytes: parseInt(data.bandwidthBytes ?? "0"),
      computeMs: parseInt(data.computeMs ?? "0"),
      activeUsers: parseInt(data.activeUsers ?? "0"),
    };
  }
}
이 데이터는 세 가지 목적에 사용됩니다. 청구(사용량 기반 가격 책정), 용량 계획(어떤 테넌트가 가장 빠르게 성장하는지), 디버깅(이 테넌트의 느린 경험이 데이터 볼륨 때문인지 플랫폼 문제 때문인지)입니다.
테넌트 수준 분석이 포함된 대시보드를 설정하세요. 경고가 발생하면 몇 초 내에 한 테넌트에 영향을 미치는지 아니면 모든 테넌트에 영향을 미치는지 확인할 수 있어야 합니다. 이는 인시던트 대응을 "뭔가 느리다"에서 "테넌트 X의 분석 쿼리가 느린 이유는 데이터셋이 현재 인덱스가 효과적인 임계값을 넘어섰기 때문입니다"로 바꿉니다.
청구 통합 패턴
멀티테넌트 시스템의 청구는 "각 테넌트에게 매월 청구"를 넘어섭니다. 플랜 계층, 사용량 기반 구성 요소, 좌석 기반 가격 책정, 주기 중 업그레이드 및 다운그레이드를 처리해야 합니다.
class BillingService {
  private stripe: Stripe;

  async syncPlanChange(tenantId: string, newPlan: PlanTier): Promise<void> {
    const tenant = await db("tenants").where({ id: tenantId }).first();

    // Update Stripe subscription
    const subscription = await this.stripe.subscriptions.retrieve(
      tenant.stripe_subscription_id
    );

    await this.stripe.subscriptions.update(subscription.id, {
      items: [{
        id: subscription.items.data[0].id,
        price: PLAN_PRICE_IDS[newPlan],
      }],
      proration_behavior: "create_prorations",
    });

    // Sync feature flags based on new plan
    await this.syncFeatureFlags(tenantId, newPlan);

    // Update limits
    await this.syncLimits(tenantId, newPlan);

    // Invalidate tenant context cache
    await redis.del(`tenant:${tenantId}:context`);
  }

  private async syncFeatureFlags(tenantId: string, plan: PlanTier): Promise<void> {
    const planFeatures = PLAN_FEATURE_MAP[plan];

    // Disable features not included in new plan
    await db("tenant_features")
      .where({ tenant_id: tenantId })
      .whereNotIn("feature_key", planFeatures)
      .update({ enabled: false });

    // Enable features included in new plan
    for (const feature of planFeatures) {
      await db("tenant_features")
        .insert({ tenant_id: tenantId, feature_key: feature, enabled: true })
        .onConflict(["tenant_id", "feature_key"])
        .merge();
    }
  }
}
사용량 기반 청구의 경우, 각 청구 기간 말에 Stripe에 사용량을 보고합니다.
async function reportUsageToStripe(tenantId: string): Promise<void> {
  const tenant = await db("tenants").where({ id: tenantId }).first();
  const usage = await usageTracker.getUsage(tenantId, getCurrentPeriod());

  // Report metered usage for API calls
  await stripe.subscriptionItems.createUsageRecord(
    tenant.stripe_metered_item_id,
    {
      quantity: usage.apiCalls,
      timestamp: Math.floor(Date.now() / 1000),
      action: "set",
    }
  );
}
이것을 각 청구 기간 말에 cron 작업으로 실행하고, 두 번 실행해도 이중 청구가 되지 않도록 멱등성을 구현합니다.
화이트 라벨링 아키텍처
화이트 라벨링은 테넌트가 플랫폼을 자체 제품으로 제시할 수 있는 기능입니다. 이는 사용자 정의 도메인, 사용자 정의 브랜딩, 사용자 정의 이메일 템플릿, 때로는 사용자 정의 UI 테마를 의미합니다.
아키텍처에는 라우팅과 테마라는 두 가지 주요 관심사가 있습니다.
사용자 정의 도메인 라우팅
// Tenant domain mapping
interface TenantDomain {
  tenantId: string;
  domain: string;        // "orders.acme-restaurant.com"
  sslStatus: "pending" | "active" | "expired";
  verifiedAt?: Date;
}

async function resolveCustomDomain(hostname: string): Promise<string | null> {
  const mapping = await redis.get(`domain:${hostname}`);
  if (mapping) return mapping;

  const row = await db("tenant_domains")
    .where({ domain: hostname, ssl_status: "active" })
    .first();

  if (row) {
    await redis.set(`domain:${hostname}`, row.tenant_id, "EX", 3600);
    return row.tenant_id;
  }

  return null;
}
테넌트 해결 미들웨어에서 서브도메인 해결로 폴백하기 전에 사용자 정의 도메인을 확인합니다.
export async function tenantMiddleware(req: Request, res: Response, next: NextFunction) {
  // 1. Check JWT claim
  // ... (existing logic)

  // 2. Check custom domain
  const customTenantId = await resolveCustomDomain(req.hostname);
  if (customTenantId) {
    req.tenantId = customTenantId;
    return next();
  }

  // 3. Fall back to subdomain
  // ... (existing logic)
}
사용자 정의 도메인의 SSL의 경우, 서브도메인에는 와일드카드 인증서를 사용하고 사용자 정의 도메인에는 DNS 또는 HTTP 챌린지가 있는 Let's Encrypt를 사용합니다. Caddy 또는 Cloudflare for SaaS와 같은 서비스는 이를 완전히 자동화할 수 있습니다.
테마 및 브랜딩
interface TenantBranding {
  tenantId: string;
  logoUrl: string;
  faviconUrl: string;
  primaryColor: string;
  secondaryColor: string;
  fontFamily?: string;
  customCSS?: string;
  emailFromName: string;
  emailFromAddress: string;
  supportUrl?: string;
  termsUrl?: string;
  privacyUrl?: string;
}
프런트엔드에서는 브랜딩을 CSS 사용자 정의 속성으로 주입합니다.
function applyBranding(branding: TenantBranding) {
  const root = document.documentElement;
  root.style.setProperty("--color-primary", branding.primaryColor);
  root.style.setProperty("--color-secondary", branding.secondaryColor);
  if (branding.fontFamily) {
    root.style.setProperty("--font-family", branding.fontFamily);
  }
}
플랫폼이 서버 렌더링되는 경우, 스타일이 지정되지 않은 콘텐츠가 깜빡이는 것을 방지하기 위해 초기 HTML 응답에 브랜딩을 주입합니다. Next.js의 경우, 이는 루트 레이아웃에서 브랜딩을 읽고 <html> 또는 <body> 태그에 CSS 변수를 인라인으로 설정하는 것을 의미합니다.
이메일 템플릿의 경우, 렌더링 시 테넌트의 브랜딩 컨텍스트를 사용합니다.
async function sendTenantEmail(tenantId: string, template: string, data: unknown) {
  const branding = await getBranding(tenantId);
  const integration = await integrations.getIntegration(tenantId, "email");

  const html = renderEmailTemplate(template, {
    ...data,
    logo: branding.logoUrl,
    primaryColor: branding.primaryColor,
    companyName: branding.emailFromName,
  });

  await emailClient(integration).send({
    from: `${branding.emailFromName} <${branding.emailFromAddress}>`,
    html,
  });
}
최종 사용자는 플랫폼의 브랜드를 전혀 보지 않습니다. 그들은 테넌트의 로고, 색상, 도메인 및 발신 주소를 봅니다. 그들에게는 그것이 테넌트의 제품입니다.
확장성 고려 사항
테넌트 수가 증가함에 따라 특정 패턴은 작동을 멈추고 교체해야 합니다.
연결 풀링이 중요해집니다. 공유 데이터베이스의 경우, 애플리케이션 인스턴스당 연결 풀로 시작할 수 있습니다. 그러나 테넌트별 스키마 또는 테넌트별 데이터베이스가 있는 경우, 순진한 연결 관리는 연결 제한을 소진시킬 것입니다. 공유 데이터베이스에는 트랜잭션 모드에서 PgBouncer를 사용하고, 테넌트 활동에 비례하여 연결이 할당되는 스키마 격리에는 연결 풀 분할을 구현합니다.
캐시 무효화가 더 어려워집니다. 단일 Redis 인스턴스에서는 테넌트의 캐시를 삭제하는 것이 간단합니다. 분산 캐시에서는 무효화 이벤트를 브로드캐스트해야 합니다. Redis Pub/Sub 또는 전용 이벤트 버스를 사용하여 모든 애플리케이션 인스턴스에 캐시 무효화를 전파합니다.
백그라운드 작업에는 테넌트 컨텍스트가 필요합니다. 대기열에 추가하는 모든 작업은 테넌트 ID를 전달해야 합니다. 작업 프로세서는 HTTP 미들웨어가 하는 것과 동일한 테넌트 컨텍스트(데이터베이스 연결, 기능 플래그, 제한)를 설정해야 합니다. 저는 작업 핸들러를 위한 withTenantScope 래퍼를 만듭니다.
function withTenantScope(handler: (tenantId: string, data: unknown) => Promise<void>) {
  return async (job: Job) => {
    const { tenantId, ...data } = job.data;
    const tenant = await buildTenantContext(tenantId);

    // Set up database context
    await withTenantContext(tenantId, async () => {
      await handler(tenantId, data);
    });
  };
}

// Usage
queue.process("generate-report", withTenantScope(async (tenantId, data) => {
  // This handler runs with full tenant context
  const report = await generateReport(tenantId, data);
  await storeReport(tenantId, report);
}));
시끄러운 이웃 감지는 공유 인프라에 필수적입니다. 테넌트별 쿼리 실행 시간, CPU 사용량 및 메모리를 추적합니다. 테넌트의 워크로드가 공유 풀을 저하시키기 시작하면 세 가지 옵션이 있습니다. 스로틀링하거나, 더 높은 격리 계층으로 마이그레이션하거나, 특정 쿼리를 최적화하는 것입니다. 모니터링은 다른 테넌트가 영향을 받기 전에 이러한 결정을 내릴 수 있는 데이터를 제공합니다.
모든 것을 종합하기
프로덕션 멀티테넌트 아키텍처는 단일 패턴이 아니라 서로 상호 작용하는 일련의 결정 스택입니다. 격리 전략은 연결 관리에 영향을 미칩니다. 기능 플래그는 청구에 영향을 미칩니다. 화이트 라벨링은 전체 프런트엔드 렌더링 파이프라인에 영향을 미칩니다. 사용자 정의 통합은 오류 처리 및 모니터링에 영향을 미칩니다.
처음부터 이를 구축하는 팀에게 제가 권장하는 순서는 다음과 같습니다.
- 모든 것을 공유하고 테넌트 범위 쿼리로 시작합니다. 먼저 제품-시장 적합성을 확보하세요.
- 가격 페이지가 생기자마자 기능 플래그와 플랜 기반 게이팅을 추가합니다.
- 첫 번째 엔터프라이즈 고객이 요청하면 통합 레지스트리를 구축합니다.
- 규정 준수 요구 사항이 발생하면 스키마 격리를 구현합니다.
- 파트너가 플랫폼을 재판매하기를 원하면 화이트 라벨링을 추가합니다.
- 테넌트를 계층 간에 이동해야 할 때 마이그레이션 도구를 구축합니다.
각 계층은 이전 계층 위에 구축됩니다. 미들웨어 파이프라인, 범위 지정 쿼리 인터페이스 및 통합 레지스트리는 그 위의 모든 것을 지원하는 기반입니다. 이것들을 제대로 구축하면 고급 패턴들이 제자리를 찾을 것입니다.
저는 레스토랑 플랫폼, 의료 SaaS, 프로젝트 관리 도구 전반에 걸쳐 이러한 패턴을 구축했습니다. 도메인은 다르지만 멀티테넌시 문제는 놀랍도록 일관적입니다. 적절한 테넌트 격리, 구성 및 관찰 가능성에 대한 투자는 "내 데이터가 다른 클라이언트와 어떻게 분리되어 있습니까?"라고 묻는 첫 번째 엔터프라이즈 고객을 확보하는 순간 그 가치를 증명합니다.
그 질문은 구매 신호입니다. 당신이 구축한 아키텍처가 바로 그 답입니다.