Multi-Tenancy Architecture Patterns: Beyond the Basics
Advanced multi-tenant architecture patterns for SaaS platforms — from data isolation strategies to per-tenant customization and scaling.
Most multi-tenancy guides stop at "add a tenant_id column and filter your queries." That gets you through the first few months. Then a tenant with 10x the data starts degrading performance for everyone else, an enterprise prospect asks about white-labeling, and a partner wants to integrate their own payment processor. Suddenly the basics are not enough.
This post covers the patterns I have implemented in production multi-tenant systems that go beyond query scoping. These are the architectural decisions that separate a prototype from a platform.
Advanced Isolation Patterns
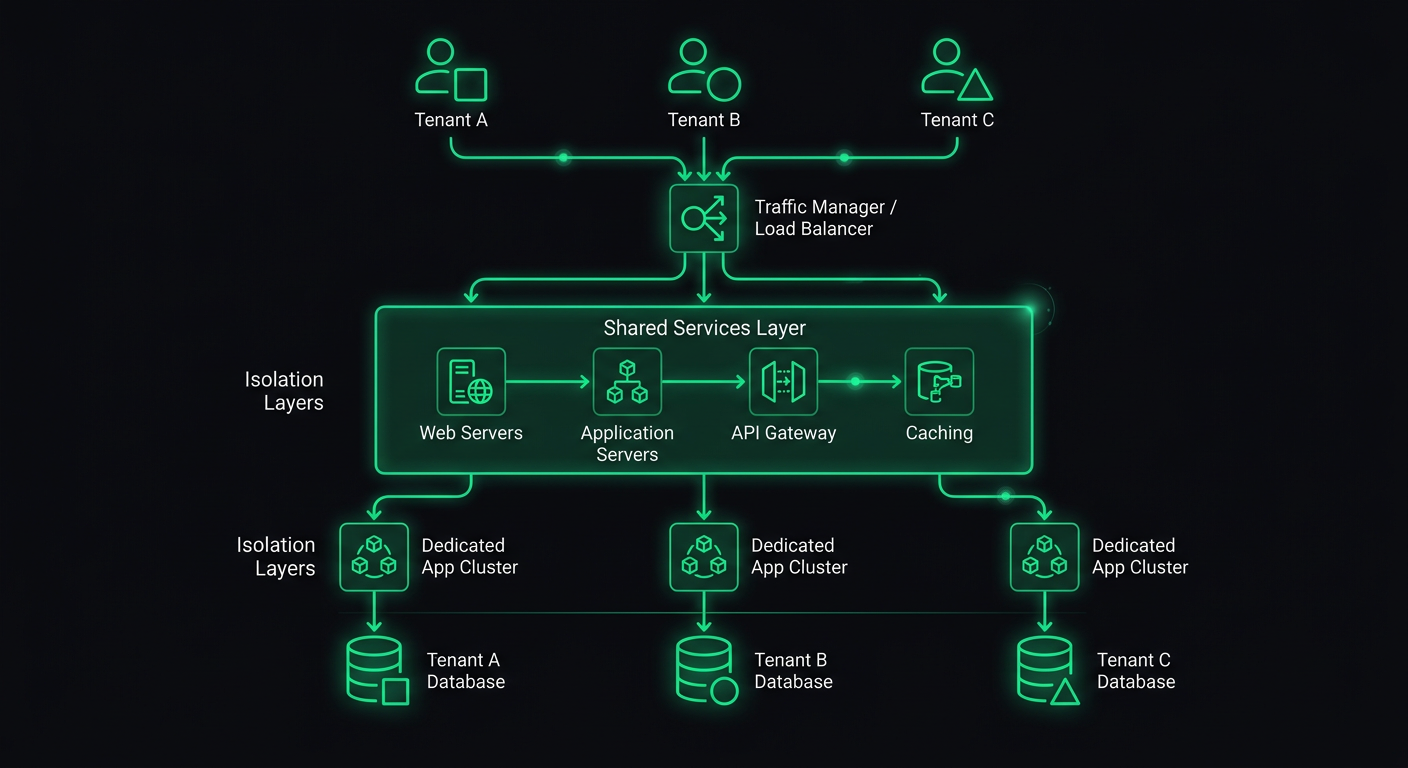
The three-tier model of shared database, schema-per-tenant, and database-per-tenant is well understood. What is less discussed is the hybrid approach that most production systems actually end up using.
Tiered Isolation by Customer Segment
In practice, you rarely pick one isolation level and apply it uniformly. Instead, you tier your isolation based on what each customer segment needs and is willing to pay for.
interface TenantConfig {
  id: string;
  slug: string;
  isolationLevel: "shared" | "schema" | "dedicated";
  databaseUrl?: string; // only for dedicated tenants
  schemaName?: string;  // only for schema-isolated tenants
}

function getConnectionForTenant(tenant: TenantConfig) {
  switch (tenant.isolationLevel) {
    case "shared":
      return getSharedPool();
    case "schema":
      return getSchemaConnection(tenant.schemaName!);
    case "dedicated":
      return getDedicatedConnection(tenant.databaseUrl!);
  }
}
The shared tier serves your self-serve customers. Schema isolation serves mid-market clients who need compliance documentation. Dedicated databases serve enterprise accounts that require physical data separation.
The key design constraint: your application code should not know or care which tier a tenant is on. The connection resolution happens in middleware, and everything downstream uses the same query interface. If a route handler has to check the isolation level to decide how to query data, your abstraction is leaking.
Row-Level Security as a Safety Net
PostgreSQL's Row-Level Security is the single most underused feature in multi-tenant architectures. Even with disciplined query scoping in your application layer, RLS provides a database-level guarantee that one tenant cannot access another tenant's data.
ALTER TABLE orders ENABLE ROW LEVEL SECURITY;

CREATE POLICY tenant_isolation ON orders
  USING (tenant_id = current_setting('app.current_tenant')::uuid);

ALTER TABLE orders FORCE ROW LEVEL SECURITY;
At the connection level, you set the tenant context before executing any queries:
async function withTenantContext<T>(
  tenantId: string,
  callback: (client: PoolClient) => Promise<T>
): Promise<T> {
  const client = await pool.connect();
  try {
    await client.query("SET app.current_tenant = $1", [tenantId]);
    return await callback(client);
  } finally {
    await client.query("RESET app.current_tenant");
    client.release();
  }
}
With this in place, even if your application code has a bug that omits the WHERE tenant_id = ? clause, the database itself will filter the results. This has caught real bugs in production for me. A developer wrote a reporting query that joined across tables and forgot the tenant filter on one of them — RLS silently returned only the correct rows instead of leaking data.
The FORCE ROW LEVEL SECURITY is important. Without it, table owners (typically the role your application uses) bypass RLS policies. With it, the policies apply to everyone.
Tenant-Aware Middleware Pipeline
The tenant resolution middleware I covered in my previous post on multi-tenant backends handles the basics: extract tenant from subdomain or JWT, attach it to the request. But a production system needs a richer middleware pipeline that builds up a full tenant context.
interface TenantContext {
  id: string;
  slug: string;
  config: TenantConfig;
  plan: PlanTier;
  features: Set<string>;
  limits: TenantLimits;
  branding?: TenantBranding;
}

async function buildTenantContext(tenantId: string): Promise<TenantContext> {
  // Cache this aggressively — it's read on every request
  const cacheKey = `tenant:${tenantId}:context`;
  const cached = await redis.get(cacheKey);
  if (cached) return JSON.parse(cached);

  const [tenant, plan, features, limits, branding] = await Promise.all([
    db("tenants").where({ id: tenantId }).first(),
    db("tenant_plans").where({ tenant_id: tenantId, active: true }).first(),
    db("tenant_features").where({ tenant_id: tenantId, enabled: true }).select("feature_key"),
    db("tenant_limits").where({ tenant_id: tenantId }).first(),
    db("tenant_branding").where({ tenant_id: tenantId }).first(),
  ]);

  const context: TenantContext = {
    id: tenant.id,
    slug: tenant.slug,
    config: tenant.config,
    plan: plan.tier,
    features: new Set(features.map((f) => f.feature_key)),
    limits: limits ?? DEFAULT_LIMITS,
    branding: branding ?? undefined,
  };

  await redis.set(cacheKey, JSON.stringify(context), "EX", 300);
  return context;
}
The middleware then attaches this full context to the request:
export async function tenantContextMiddleware(
  req: Request,
  res: Response,
  next: NextFunction
) {
  if (!req.tenantId) return next();

  try {
    req.tenantContext = await buildTenantContext(req.tenantId);

    // Check if tenant is active
    if (req.tenantContext.config.status === "suspended") {
      return res.status(403).json({
        error: "Account suspended",
        reason: req.tenantContext.config.suspensionReason,
      });
    }

    next();
  } catch (error) {
    next(error);
  }
}
Every downstream handler now has access to the full tenant context without making additional database calls. The five-minute cache means a plan change propagates quickly, but you are not hitting the database on every request to check if a feature is enabled.
Dynamic Configuration per Tenant
Beyond feature flags, tenants often need configurable behavior. A restaurant platform might let each restaurant set their own order cutoff times, tax rates, delivery zones, and notification preferences. A project management tool might let each workspace configure custom fields, workflow stages, and notification rules.
The pattern I use separates configuration into a schema-validated JSON column:
import { z } from "zod";

const TenantSettingsSchema = z.object({
  timezone: z.string().default("UTC"),
  locale: z.string().default("en"),
  currency: z.string().default("USD"),
  notifications: z.object({
    emailDigest: z.enum(["daily", "weekly", "never"]).default("daily"),
    slackWebhook: z.string().url().optional(),
    webhookUrl: z.string().url().optional(),
  }).default({}),
  limits: z.object({
    maxUsersOverride: z.number().optional(),
    maxStorageMbOverride: z.number().optional(),
    apiRateLimitOverride: z.number().optional(),
  }).default({}),
  customFields: z.array(z.object({
    key: z.string(),
    label: z.string(),
    type: z.enum(["text", "number", "date", "select"]),
    options: z.array(z.string()).optional(),
    required: z.boolean().default(false),
  })).default([]),
});

type TenantSettings = z.infer<typeof TenantSettingsSchema>;
The settings are stored as JSONB in PostgreSQL, which gives you indexing and querying capabilities while keeping the schema flexible:
async function getTenantSettings(tenantId: string): Promise<TenantSettings> {
  const row = await db("tenant_settings")
    .where({ tenant_id: tenantId })
    .first();

  return TenantSettingsSchema.parse(row?.settings ?? {});
}

async function updateTenantSettings(
  tenantId: string,
  updates: Partial<TenantSettings>
): Promise<TenantSettings> {
  const current = await getTenantSettings(tenantId);
  const merged = { ...current, ...updates };
  const validated = TenantSettingsSchema.parse(merged);

  await db("tenant_settings")
    .insert({
      tenant_id: tenantId,
      settings: validated,
      updated_at: new Date(),
    })
    .onConflict("tenant_id")
    .merge();

  // Invalidate cache
  await redis.del(`tenant:${tenantId}:context`);

  return validated;
}
The Zod schema serves double duty: it validates settings on write and provides defaults on read. If you add a new setting, existing tenants automatically get the default value without a data migration.
Feature Flags per Tenant
Simple boolean flags are not enough for a mature platform. You need support for percentage rollouts, plan-based gating, and per-tenant overrides.
interface FeatureFlag {
  key: string;
  defaultEnabled: boolean;
  rolloutPercentage: number; // 0-100
  planMinimum?: PlanTier;
  tenantOverrides: Map<string, boolean>; // explicit per-tenant overrides
}

class FeatureFlagService {
  private flags: Map<string, FeatureFlag>;

  constructor(private cache: CacheStore) {
    this.flags = new Map();
  }

  async isEnabled(tenantId: string, featureKey: string): Promise<boolean> {
    const flag = await this.getFlag(featureKey);
    if (!flag) return false;

    // Explicit per-tenant override takes precedence
    if (flag.tenantOverrides.has(tenantId)) {
      return flag.tenantOverrides.get(tenantId)!;
    }

    // Plan-based gating
    if (flag.planMinimum) {
      const tenantPlan = await this.getTenantPlan(tenantId);
      if (planRank(tenantPlan) < planRank(flag.planMinimum)) {
        return false;
      }
    }

    // Percentage rollout — deterministic based on tenant ID
    if (flag.rolloutPercentage < 100) {
      const hash = this.hashTenantFeature(tenantId, featureKey);
      return hash % 100 < flag.rolloutPercentage;
    }

    return flag.defaultEnabled;
  }

  private hashTenantFeature(tenantId: string, featureKey: string): number {
    const str = `${tenantId}:${featureKey}`;
    let hash = 0;
    for (let i = 0; i < str.length; i++) {
      hash = ((hash << 5) - hash + str.charCodeAt(i)) | 0;
    }
    return Math.abs(hash);
  }
}
The deterministic hash is important for rollouts. A tenant either consistently sees the feature or does not — you do not want them to see it on one request and not on the next. The hash is computed from the tenant ID and feature key, so different features can roll out to different subsets of tenants.
In route handlers, the check is clean:
app.get("/api/v2/analytics", async (req, res) => {
  const useNewAnalytics = await featureFlags.isEnabled(
    req.tenantId,
    "analytics_v2"
  );

  if (useNewAnalytics) {
    return res.json(await analyticsV2.getDashboard(req.tenantId));
  }

  return res.json(await analyticsV1.getDashboard(req.tenantId));
});
Tenant-Specific Integrations
Enterprise tenants will want to connect their own tools: their own Stripe account for payment processing, their own SendGrid account for emails, their own S3 bucket for file storage. Your platform needs to support this without turning into a configuration nightmare.
The pattern is an integration registry that resolves the correct credentials per tenant:
interface IntegrationConfig {
  provider: string;
  credentials: Record<string, string>; // encrypted at rest
  settings: Record<string, unknown>;
  isCustom: boolean; // true = tenant's own account, false = platform default
}

class IntegrationRegistry {
  async getIntegration(
    tenantId: string,
    integrationType: "email" | "payment" | "storage" | "sms"
  ): Promise<IntegrationConfig> {
    // Check for tenant-specific integration first
    const custom = await db("tenant_integrations")
      .where({ tenant_id: tenantId, type: integrationType, active: true })
      .first();

    if (custom) {
      return {
        provider: custom.provider,
        credentials: await decrypt(custom.encrypted_credentials),
        settings: custom.settings,
        isCustom: true,
      };
    }

    // Fall back to platform defaults
    return this.getPlatformDefault(integrationType);
  }
}
The service layer then uses the registry to get the correct client:
class EmailService {
  constructor(private integrations: IntegrationRegistry) {}

  async sendEmail(tenantId: string, email: EmailPayload): Promise<void> {
    const config = await this.integrations.getIntegration(tenantId, "email");

    const client = this.createClient(config);
    await client.send({
      from: config.settings.fromAddress as string,
      ...email,
    });
  }

  private createClient(config: IntegrationConfig): EmailClient {
    switch (config.provider) {
      case "sendgrid":
        return new SendGridClient(config.credentials.apiKey);
      case "ses":
        return new SESClient(config.credentials);
      case "resend":
        return new ResendClient(config.credentials.apiKey);
      default:
        throw new Error(`Unknown email provider: ${config.provider}`);
    }
  }
}
This means one tenant can use the platform's shared SendGrid account while another uses their own Amazon SES instance with their own domain and reputation. The rest of your application code does not know or care — it calls emailService.sendEmail() and the integration layer handles the routing.
Credential security is non-negotiable here. Tenant-provided API keys must be encrypted at rest, preferably with per-tenant encryption keys. Use something like AWS KMS or HashiCorp Vault to manage this — do not roll your own encryption key management.
Data Migration Between Isolation Levels
One of the trickiest operational challenges in multi-tenant systems is migrating a tenant from one isolation level to another. A growing tenant might move from shared tables to their own schema. An enterprise deal might require migrating a tenant to a dedicated database.
The migration needs to be zero-downtime, which means you cannot just dump and restore. Here is the pattern I use:
interface TenantMigration {
  tenantId: string;
  fromLevel: IsolationLevel;
  toLevel: IsolationLevel;
  status: "pending" | "syncing" | "verifying" | "cutover" | "complete" | "failed";
  startedAt: Date;
  completedAt?: Date;
}

class TenantMigrator {
  async migrateToSchema(tenantId: string): Promise<void> {
    const migration = await this.createMigration(tenantId, "shared", "schema");

    try {
      // 1. Create the target schema with all tables
      await this.createSchema(tenantId);
      await this.updateStatus(migration, "syncing");

      // 2. Copy existing data to the new schema
      await this.copyData(tenantId, "public", `tenant_${tenantId}`);

      // 3. Set up Change Data Capture to sync ongoing writes
      const cdcStream = await this.startCDC(tenantId, "public", `tenant_${tenantId}`);

      // 4. Verify data consistency
      await this.updateStatus(migration, "verifying");
      const isConsistent = await this.verifyConsistency(tenantId);
      if (!isConsistent) throw new Error("Data consistency check failed");

      // 5. Cutover: update tenant config to point to new schema
      await this.updateStatus(migration, "cutover");
      await db("tenants").where({ id: tenantId }).update({
        isolation_level: "schema",
        schema_name: `tenant_${tenantId}`,
      });

      // 6. Invalidate caches
      await redis.del(`tenant:${tenantId}:context`);

      // 7. Stop CDC and clean up source data
      await cdcStream.stop();
      await this.cleanupSourceData(tenantId, "public");

      await this.updateStatus(migration, "complete");
    } catch (error) {
      await this.updateStatus(migration, "failed");
      await this.rollback(migration);
      throw error;
    }
  }
}
The Change Data Capture step is critical. Between copying the initial data and performing the cutover, new writes are happening against the shared tables. CDC captures those writes and replays them into the new schema so nothing is lost.
In practice, I use PostgreSQL logical replication for this. You create a publication on the source tables filtered by tenant_id, and a subscription on the target schema. Once the replication lag is near zero, you perform the cutover.
The rollback path is equally important. If anything fails during migration, you need to be able to undo everything cleanly. This means keeping the source data intact until the migration is verified and the tenant has been operating on the new schema for a confidence period (I typically wait 48 hours before cleaning up source data).
Per-Tenant Monitoring and Observability
In a multi-tenant system, "the API is slow" is not actionable. You need to know which tenant is affected, which queries are slow, and whether the issue is tenant-specific (noisy neighbor, large dataset) or platform-wide.
import { metrics } from "./lib/metrics"; // Prometheus, Datadog, etc.

function tenantMetricsMiddleware(req: Request, res: Response, next: NextFunction) {
  const start = Date.now();

  res.on("finish", () => {
    const duration = Date.now() - start;
    const labels = {
      tenant_id: req.tenantId,
      method: req.method,
      route: req.route?.path ?? "unknown",
      status: String(res.statusCode),
    };

    metrics.histogram("http_request_duration_ms", duration, labels);
    metrics.counter("http_requests_total", 1, labels);

    // Alert on tenant-specific degradation
    if (duration > 2000) {
      metrics.counter("http_slow_requests_total", 1, labels);
    }
  });

  next();
}
Beyond request-level metrics, track resource consumption per tenant:
interface TenantUsageMetrics {
  tenantId: string;
  period: string; // "2026-03"
  apiCalls: number;
  storageBytes: number;
  bandwidthBytes: number;
  computeMs: number;
  activeUsers: number;
}

class UsageTracker {
  async recordAPICall(tenantId: string, durationMs: number): Promise<void> {
    const period = this.getCurrentPeriod();
    await redis.hincrby(`usage:${tenantId}:${period}`, "apiCalls", 1);
    await redis.hincrby(`usage:${tenantId}:${period}`, "computeMs", durationMs);
  }

  async getUsage(tenantId: string, period: string): Promise<TenantUsageMetrics> {
    const data = await redis.hgetall(`usage:${tenantId}:${period}`);
    return {
      tenantId,
      period,
      apiCalls: parseInt(data.apiCalls ?? "0"),
      storageBytes: parseInt(data.storageBytes ?? "0"),
      bandwidthBytes: parseInt(data.bandwidthBytes ?? "0"),
      computeMs: parseInt(data.computeMs ?? "0"),
      activeUsers: parseInt(data.activeUsers ?? "0"),
    };
  }
}
This data feeds three purposes: billing (usage-based pricing), capacity planning (which tenants are growing fastest), and debugging (is this tenant's slow experience due to their data volume or a platform issue).
Set up dashboards with tenant-level breakdowns. When an alert fires, you should be able to see within seconds whether it affects one tenant or all of them. This changes your incident response from "something is slow" to "Tenant X's analytics queries are slow because their dataset grew past the threshold where our current indexes are effective."
Billing Integration Patterns
Billing in a multi-tenant system goes beyond "charge each tenant monthly." You need to handle plan tiers, usage-based components, seat-based pricing, and mid-cycle upgrades and downgrades.
class BillingService {
  private stripe: Stripe;

  async syncPlanChange(tenantId: string, newPlan: PlanTier): Promise<void> {
    const tenant = await db("tenants").where({ id: tenantId }).first();

    // Update Stripe subscription
    const subscription = await this.stripe.subscriptions.retrieve(
      tenant.stripe_subscription_id
    );

    await this.stripe.subscriptions.update(subscription.id, {
      items: [{
        id: subscription.items.data[0].id,
        price: PLAN_PRICE_IDS[newPlan],
      }],
      proration_behavior: "create_prorations",
    });

    // Sync feature flags based on new plan
    await this.syncFeatureFlags(tenantId, newPlan);

    // Update limits
    await this.syncLimits(tenantId, newPlan);

    // Invalidate tenant context cache
    await redis.del(`tenant:${tenantId}:context`);
  }

  private async syncFeatureFlags(tenantId: string, plan: PlanTier): Promise<void> {
    const planFeatures = PLAN_FEATURE_MAP[plan];

    // Disable features not included in new plan
    await db("tenant_features")
      .where({ tenant_id: tenantId })
      .whereNotIn("feature_key", planFeatures)
      .update({ enabled: false });

    // Enable features included in new plan
    for (const feature of planFeatures) {
      await db("tenant_features")
        .insert({ tenant_id: tenantId, feature_key: feature, enabled: true })
        .onConflict(["tenant_id", "feature_key"])
        .merge();
    }
  }
}
For usage-based billing, you report usage to Stripe at the end of each billing period:
async function reportUsageToStripe(tenantId: string): Promise<void> {
  const tenant = await db("tenants").where({ id: tenantId }).first();
  const usage = await usageTracker.getUsage(tenantId, getCurrentPeriod());

  // Report metered usage for API calls
  await stripe.subscriptionItems.createUsageRecord(
    tenant.stripe_metered_item_id,
    {
      quantity: usage.apiCalls,
      timestamp: Math.floor(Date.now() / 1000),
      action: "set",
    }
  );
}
Run this on a cron job at the end of each billing period, and implement idempotency so running it twice does not double-charge.
White-Labeling Architecture
White-labeling is the ability for tenants to present your platform as their own product. This means custom domains, custom branding, custom email templates, and sometimes custom UI themes.
The architecture has two main concerns: routing and theming.
Custom Domain Routing
// Tenant domain mapping
interface TenantDomain {
  tenantId: string;
  domain: string;        // "orders.acme-restaurant.com"
  sslStatus: "pending" | "active" | "expired";
  verifiedAt?: Date;
}

async function resolveCustomDomain(hostname: string): Promise<string | null> {
  const mapping = await redis.get(`domain:${hostname}`);
  if (mapping) return mapping;

  const row = await db("tenant_domains")
    .where({ domain: hostname, ssl_status: "active" })
    .first();

  if (row) {
    await redis.set(`domain:${hostname}`, row.tenant_id, "EX", 3600);
    return row.tenant_id;
  }

  return null;
}
In your tenant resolution middleware, check custom domains before falling back to subdomain resolution:
export async function tenantMiddleware(req: Request, res: Response, next: NextFunction) {
  // 1. Check JWT claim
  // ... (existing logic)

  // 2. Check custom domain
  const customTenantId = await resolveCustomDomain(req.hostname);
  if (customTenantId) {
    req.tenantId = customTenantId;
    return next();
  }

  // 3. Fall back to subdomain
  // ... (existing logic)
}
For SSL on custom domains, use a wildcard certificate for your subdomains and Let's Encrypt with DNS or HTTP challenge for custom domains. Services like Caddy or Cloudflare for SaaS can automate this entirely.
Theming and Branding
interface TenantBranding {
  tenantId: string;
  logoUrl: string;
  faviconUrl: string;
  primaryColor: string;
  secondaryColor: string;
  fontFamily?: string;
  customCSS?: string;
  emailFromName: string;
  emailFromAddress: string;
  supportUrl?: string;
  termsUrl?: string;
  privacyUrl?: string;
}
On the frontend, inject the branding as CSS custom properties:
function applyBranding(branding: TenantBranding) {
  const root = document.documentElement;
  root.style.setProperty("--color-primary", branding.primaryColor);
  root.style.setProperty("--color-secondary", branding.secondaryColor);
  if (branding.fontFamily) {
    root.style.setProperty("--font-family", branding.fontFamily);
  }
}
If the platform is server-rendered, inject the branding into the initial HTML response so there is no flash of unstyled content. With Next.js, this means reading the branding in your root layout and setting the CSS variables inline in the <html> or <body> tag.
For email templates, use the tenant's branding context when rendering:
async function sendTenantEmail(tenantId: string, template: string, data: unknown) {
  const branding = await getBranding(tenantId);
  const integration = await integrations.getIntegration(tenantId, "email");

  const html = renderEmailTemplate(template, {
    ...data,
    logo: branding.logoUrl,
    primaryColor: branding.primaryColor,
    companyName: branding.emailFromName,
  });

  await emailClient(integration).send({
    from: `${branding.emailFromName} <${branding.emailFromAddress}>`,
    html,
  });
}
The end user never sees your platform's brand. They see the tenant's logo, colors, domain, and from-address. To them, it is the tenant's product.
Scaling Considerations
As your tenant count grows, certain patterns stop working and need to be replaced.
Connection pooling becomes critical. With shared databases, you might start with a connection pool per application instance. But when you have schema-per-tenant or database-per-tenant, naive connection management will exhaust your connection limits. Use PgBouncer in transaction mode for shared databases, and implement connection pool partitioning for schema isolation where connections are allocated proportionally to tenant activity.
Cache invalidation gets harder. With a single Redis instance, deleting a tenant's cache is simple. With a distributed cache, you need to broadcast invalidation events. Use Redis Pub/Sub or a dedicated event bus to propagate cache invalidations across all application instances.
Background jobs need tenant context. Every job you enqueue must carry the tenant ID. The job processor must set up the same tenant context (database connection, feature flags, limits) that the HTTP middleware does. I create a withTenantScope wrapper for job handlers:
function withTenantScope(handler: (tenantId: string, data: unknown) => Promise<void>) {
  return async (job: Job) => {
    const { tenantId, ...data } = job.data;
    const tenant = await buildTenantContext(tenantId);

    // Set up database context
    await withTenantContext(tenantId, async () => {
      await handler(tenantId, data);
    });
  };
}

// Usage
queue.process("generate-report", withTenantScope(async (tenantId, data) => {
  // This handler runs with full tenant context
  const report = await generateReport(tenantId, data);
  await storeReport(tenantId, report);
}));
Noisy neighbor detection is essential for shared infrastructure. Track query execution time, CPU usage, and memory per tenant. When a tenant's workload starts degrading the shared pool, you have three options: throttle them, migrate them to a higher isolation tier, or optimize their specific queries. Monitoring gives you the data to make that call before other tenants are affected.
Putting It All Together
A production multi-tenant architecture is not a single pattern — it is a stack of decisions that interact with each other. The isolation strategy affects your connection management. Feature flags affect billing. White-labeling affects your entire frontend rendering pipeline. Custom integrations affect your error handling and monitoring.
The sequence I recommend for teams building this from scratch:
- Start with shared-everything and tenant-scoped queries. Get your product-market fit first.
- Add feature flags and plan-based gating as soon as you have a pricing page.
- Build the integration registry when your first enterprise customer asks for it.
- Implement schema isolation when a compliance requirement demands it.
- Add white-labeling when a partner wants to resell your platform.
- Build the migration tooling when you need to move a tenant between tiers.
Each layer builds on the previous one. The middleware pipeline, the scoped query interface, and the integration registry are foundations that support everything above them. Get those right, and the advanced patterns fall into place.
I have built these patterns across restaurant platforms, medical SaaS, and project management tools. The domains are different, but the multi-tenancy challenges are remarkably consistent. The investment in proper tenant isolation, configuration, and observability pays for itself the moment you land your first enterprise customer who asks, "How is my data separated from your other clients?"
That question is a buying signal. The architecture you built is the answer.
Danil Ulmashev
Full Stack Developer
Need a senior developer to build something like this for your business?